

A through-hull sonar transducer spends the boating season in one of the harshest places aboard: below the waterline, exposed to slime, barnacles, impact, bottom paint, vibration, and water pressure. Even a sound depth finder can gradually lose bottom detail, speed accuracy, or temperature response when growth covers the sensing face or a paddlewheel stops turning.
Haulout creates the best opportunity for a close inspection because the transducer can be cleaned and examined without working underwater. The goal is not to make every transducer look new. It is to preserve the sensing surface, confirm the housing and installation remain sound, and avoid coatings or tools that damage the material.
This article covers fixed through-hull depth and temperature transducers plus retractable speed/temperature inserts. It does not replace the owner’s guide for the exact model. Plastic, bronze, stainless-steel, tilted-element, flush, fairing-block, and retractable sensors can have different cleaning, coating, sealing, and service requirements.
Identify the Transducer Before Cleaning It
Start with the chartplotter or sonar installation record, the label on the cable, and any markings on the housing. Record:
- Manufacturer and model
- Depth-only, depth/temperature, or speed/depth/temperature functions
- Housing material
- Fixed or retractable design
- Connector or adapter part number
- Recommended antifouling coating
- Paddlewheel, O-ring, insert, blanking-plug, and seal part numbers, if applicable
Do not identify a transducer only by its outside shape. Several models share similar housings while using different frequencies, elements, connectors, or insert assemblies. Airmar notes in its owner guidance that replacement information is printed on the cable tag. Photograph that tag before age or bilge conditions make it unreadable.
Also save the model-specific manual. Instructions for an Airmar retractable multisensor differ from those for a fixed tilted-element depth transducer, and the sonar manufacturer may have additional guidance for the connected display.
Make the Work Area Safe
Confirm the boat is properly supported by the yard before going beneath it. Never rely on a jack, hydraulic trailer component, or an improvised prop, and do not move stands or blocking. Follow the boatyard’s access rules.
Turn off the sonar or chartplotter circuit before disconnecting or handling wiring. Sonar equipment should not transmit through a dry transducer unless its manufacturer expressly allows it. If the boat has several similar sensors, label the circuit and cable before service.
Rinse loose salt and debris from the hull with fresh water. Use eye protection when working under the hull, especially if old antifouling paint or dried marine growth may fall. Collect removed material and coating residue according to yard rules; do not wash paint dust or growth into a storm drain.
Inspect the Sensing Face and Housing
Examine the transducer before scrubbing so stains do not hide useful clues. Look for:
- Slime, weed, shells, or hard growth on the sensing face
- Chips, deep scratches, cracks, swelling, or delamination
- Impact marks on the housing, fairing block, or surrounding hull
- A gap between the housing flange and hull
- Loose, cracked, or missing sealant
- Paint bridging a joint that should remain serviceable
- Corrosion products or unusual discoloration
- A bent or missing paddlewheel blade
- Evidence that a retractable insert is not fully seated
A shallow scratch in an approved coating is different from a crack in the transducer face. Do not grind, pry, or probe a suspicious defect. The acoustic face is part of the sensing assembly, not a sacrificial cover. If it is cracked, deeply damaged, swollen, or loose, stop and consult the manufacturer or a qualified installer.
On installations with a fairing block, inspect the leading and trailing edges, the fit against the hull, and the exposed portion of the housing. A loose fairing, cracked block, or shifted transducer can disturb water flow and increase structural load. Do not tighten an unknown through-hull nut from outside; installation torque and bedding procedures are model-specific.
Remove Growth Without Damaging the Face
Airmar warns that aquatic growth can reduce transducer performance within weeks. Its model-specific manuals commonly direct owners to clean the surface with mild household detergent and a nonaggressive scour pad, taking care not to scratch the face. Some manuals allow careful wet sanding with fine wet/dry paper when fouling is severe. That is not permission to sand every transducer.
Use the least aggressive method approved for your model:
- Soften ordinary slime with fresh water.
- Wash with the manufacturer-approved mild detergent.
- Use a soft brush or the specified pad with light pressure.
- Work around edges without levering against the housing.
- Rinse completely and inspect again.
Avoid metal scrapers, wire brushes, power sanding, pressure-washer nozzles held close to seals, and unapproved solvents. Cleaners, fuel, paint remover, and solvents can attack plastic housings and acoustic-face materials. If hard growth will not release with an approved method, ask the transducer manufacturer or boatyard how to proceed.
Do not polish the sensing face with wax. A smooth wax film may seem harmless, but the sensor manufacturer—not a general hull-care recommendation—should determine what may touch the acoustic surface.
Use Only Compatible Antifouling Coating
Marine growth often returns quickly to an unprotected sensor. Both Airmar and Garmin publish model guidance calling for a water-based antifouling coating intended for transducers. Airmar manuals also warn against ketone-based coatings because ketones can damage many plastics.
The exact coating area matters. Depending on the model, the manufacturer may direct coating of the transducer face, exposed housing, paddlewheel insert, and parts of a blanking plug while keeping O-rings, threads, electrical contacts, and moving bearing surfaces free of paint. Do not cover a temperature sensor opening, fill a seam, or immobilize a paddlewheel.
Never assume the boat’s copper-based bottom paint is suitable for the transducer. Housing material, galvanic compatibility, and acoustic performance all matter. Confirm the product on the transducer maker’s approved list, note the coating used, and follow its recoat schedule.
Strip incompatible paint only by a method approved for the sensor material. Aggressive solvents and blasting can turn a maintenance task into a replacement.
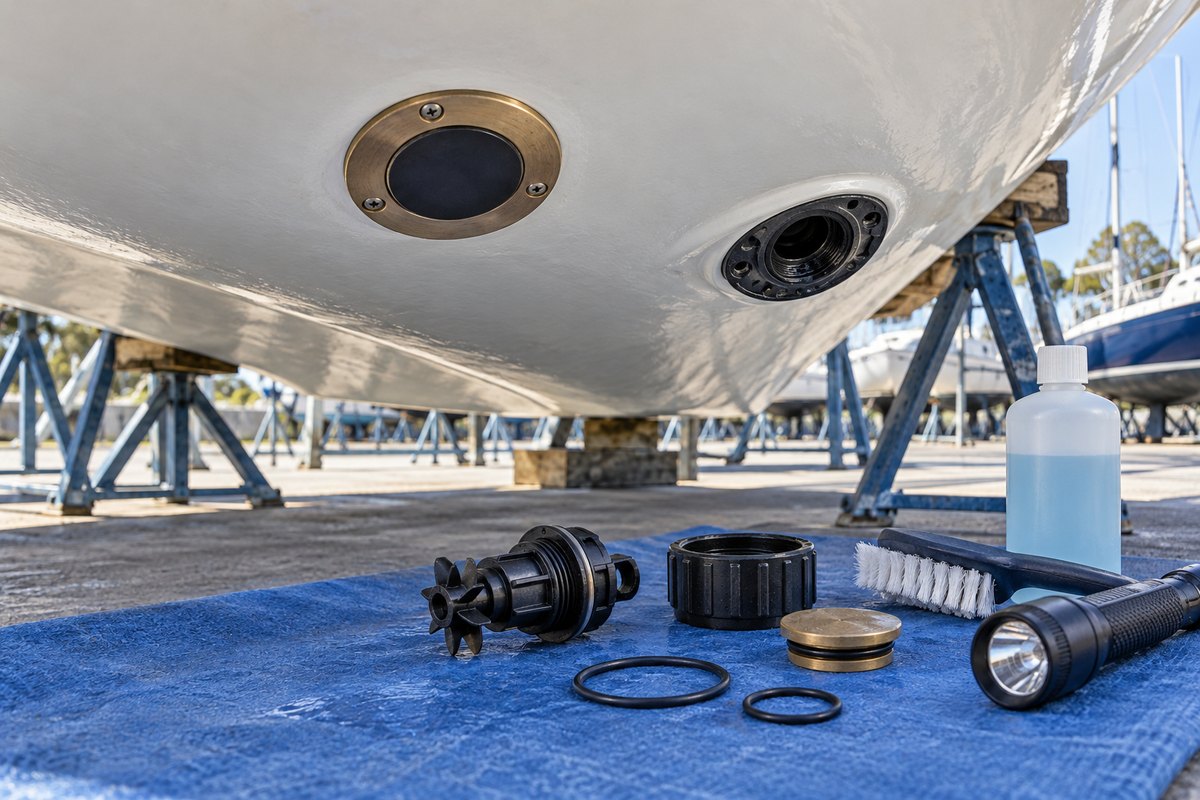
Service a Retractable Paddlewheel Insert Carefully
Some through-hull housings accept a removable speed/temperature insert and a blanking plug. Haulout is an ideal time to service these parts because removing the insert cannot flood the boat. If service must ever be done afloat, follow the exact valve and blanking-plug procedure and be prepared for water entry; do not improvise.
With the boat out of the water:
- Photograph the insert orientation before removal.
- Verify the retaining cap, safety wire, or locking feature is intact.
- Remove the insert according to its manual.
- Check that the paddlewheel spins freely and evenly.
- Inspect every blade for bending, cracks, or missing material.
- Clean the shaft and wheel without enlarging the bearing area.
- Inspect O-rings for cuts, flattening, swelling, or brittleness.
- Clean O-ring grooves and mating surfaces.
- Replace seals with the specified size and material.
- Apply only the lubricant named by the manufacturer.
- Inspect the blanking plug and keep it immediately accessible aboard.
Do not substitute petroleum grease for a specified silicone lubricant. The wrong product can swell seal material. Do not pack the paddlewheel with grease; excess lubricant attracts debris and may slow the wheel.
Reinstall the insert in the documented direction. A directional arrow or key normally points toward the bow. A reversed or incompletely seated insert can give inaccurate speed readings or create a leak path.
Inspect the Installation From Inside the Boat
The exterior face is only half the installation. Inside the hull, inspect the accessible housing, retaining nut, cable, and surrounding bilge area. Look for dried salt, green corrosion, water tracks, staining, softened core material, movement, or sealant failure.
The housing should not rotate when handled gently. Do not use the cable as a handhold, and do not tighten the retaining nut simply because it is accessible. Overtightening can damage a plastic housing, distort the hull laminate, or break an established seal. Movement or leakage calls for model-specific reinstallation, often by a qualified technician.
Follow the cable from housing to display or sonar module. Confirm it is supported, protected from chafe, and separated from moving machinery and high-current wiring as the installation manual requires. Inspect connectors for bent pins, moisture, corrosion, and a secure locking collar. Do not cut or splice a transducer cable unless the manufacturer provides an approved procedure or junction box; cable construction is part of the sonar system.
Plan the Launch-Day Leak and Performance Checks
A dry-land inspection cannot prove that a through-hull fitting is watertight. Immediately after launching, inspect the interior housing and surrounding bilge. Airmar manuals commonly call for checking the installation promptly and again after the boat has been in the water for several hours. Use the timing stated for your model.
Then restore power and confirm each supported function:
- Stable depth in known water
- Plausible water temperature
- Smooth speed response from a paddlewheel as the boat moves
- No intermittent loss when turning or accelerating
- Expected sonar image at idle and normal cruise
Loss of bottom at speed can result from aerated water or installation location as well as fouling. A zero paddlewheel speed may be a stuck wheel, a reversed insert, a damaged cable, or a display configuration issue. Do not condemn the sensor until the installation and settings are checked.
End-of-Season Through-Hull Transducer Checklist
- Identify the exact model and save its owner’s guide.
- Photograph the cable tag and exterior installation.
- Isolate sonar power before service.
- Inspect the face, housing, sealant, fairing, and surrounding hull.
- Remove growth with only the approved cleaning method.
- Check paddlewheel blades, shaft movement, seals, cap, and blanking plug.
- Replace damaged O-rings with specified parts.
- Apply only the approved seal lubricant.
- Use transducer-compatible water-based antifouling coating.
- Keep paint off seals, threads, contacts, and moving surfaces.
- Inspect the interior housing, cable routing, and connectors.
- Schedule professional repair for cracks, movement, impact, or leakage.
- Perform immediate and follow-up leak checks after launch.
- Confirm depth, temperature, speed, and sonar performance underway.
Record the Work in BoatDuty
Create a BoatDuty entry with the service date, haulout location, transducer manufacturer and model, functions, housing material, display or sonar module, and cable or adapter details. Record the cleaner, pad or brush, antifouling product, O-ring kit, and lubricant used. Add notes on growth severity, face condition, paddlewheel movement, seal condition, and the launch-day leak check.
If performance was the reason for service, record the symptom and operating conditions: water depth, boat speed, whether bottom was lost only on plane, and whether temperature or paddlewheel speed also failed. That history helps distinguish recurring fouling from an installation, cable, or electronics problem.
When to Use a Qualified Installer
Bring in a qualified marine electronics installer or boatyard when the transducer face is cracked, the housing moves, the fairing is damaged, bedding has failed, core material is wet, the cable is cut, a connector is corroded internally, or the installation leaks after launch. Replacement and rebedding require the correct sealant, hull preparation, orientation, torque, and cure time. Below-waterline hardware deserves a complete repair, not a cosmetic bead of sealant around the outside.