

Outboard jack plate maintenance deserves the same care as steering and engine mounting because the plate sits between the outboard and the boat’s transom. It carries the engine’s weight and thrust while moving that load vertically. Loose hardware, binding guides, hydraulic leakage, damaged wiring, or interference with steering components can affect handling and damage expensive equipment.
An end-of-season inspection provides a controlled opportunity to clean the plate, check structure and fasteners, verify movement, and establish a baseline before storage. This guide covers both manual and powered jack plates, but designs vary. Hydraulic, electro-hydraulic, and electric plates have different service points and storage requirements. Follow the current manual for the exact plate, engine, steering system, and boat.
Understand What the Jack Plate Does
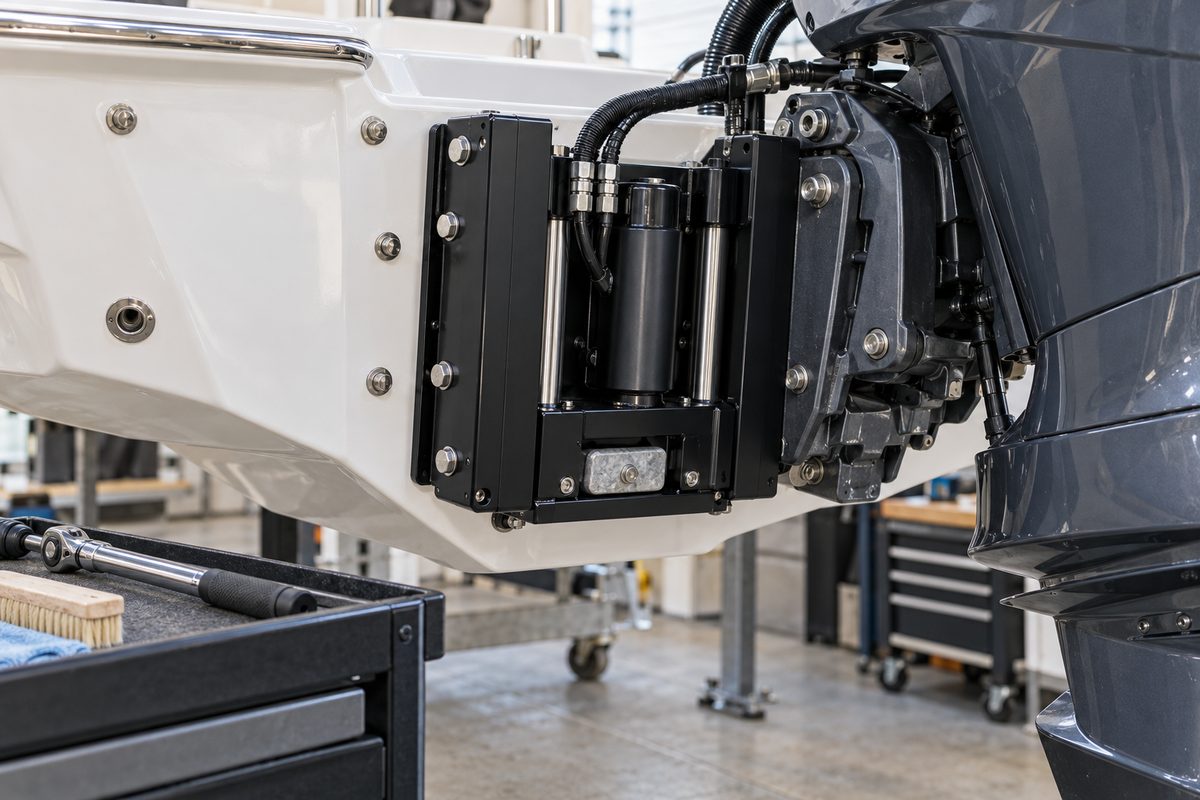
A jack plate changes engine height without changing the outboard’s trim angle. The plate mounts to the transom, and the engine mounts to the plate. Moving the engine up can improve shallow-water access and help tune performance; moving it down restores deeper gearcase immersion and cooling-water pickup.
Setback increases leverage on the transom and creates additional clearance relationships among the engine, steering cylinder, hoses, rigging tube, transom, swim platform, and shallow-water anchors. That is why a jack plate cannot be inspected as an isolated accessory.
Identify:
- manufacturer, model, serial number, setback, and rated engine capacity;
- manual, hydraulic, or electric actuation;
- engine-to-plate and plate-to-transom mounting hardware;
- guide rods, rails, slides, or bushings;
- actuator, pump, relays, harness, switch, and position gauge if equipped;
- anode location if provided; and
- any manufacturer-approved support or storage device.
Make the Work Area Safe
Secure the boat and remove the ignition key. Disable the engine start circuit according to the engine manual and isolate jack-plate power before placing tools near the mechanism. Keep hands, clothing, and cables away from pinch points.
Never work beneath an engine supported only by hydraulic pressure. Dometic’s SeaStar manual states that the hydraulic jack plate should not be relied upon to hold position for long-term storage or trailering. Use only the support, lock, hoist, or service procedure approved by the plate and engine manufacturers.
Do not loosen structural mounting bolts unless the engine is safely supported and the service procedure requires it. An outboard and jack plate assembly can weigh hundreds of pounds, and small movement at a fastener can release stored load.
Wash Away Salt and Contamination
Rinse the plate thoroughly with fresh, clean water. Dometic recommends a freshwater washdown after use and warns against cleaners containing ammonia, acids, or other corrosive ingredients on SeaStar jack plates. Pay attention to crevices around guide rods, side plates, the actuator shaft, and lower mounting areas.
Use a soft brush for dried salt or mud. Do not direct high-pressure water into seals, electrical connectors, or the actuator. Dry the assembly and move it only after visible grit has been removed; operating a contaminated slide can carry abrasive material into bushings and seals.
Inspect the Plate Structure
Use bright light to examine both sides of the assembly. Look for:
- cracks, deformation, gouges, or impact marks;
- wear patterns where moving sections contact;
- binding, uneven gaps, or a plate that appears racked;
- corrosion under fasteners or around dissimilar metals;
- loose brackets, guide hardware, or end stops;
- damaged labels or missing safety information; and
- evidence that accessories are loading the plate in an unapproved way.
Dometic directs owners to inspect brackets, guide rods, the actuator shaft, and the actuator-shaft seal for damage, wear, binding, and leakage. A crack or distortion is not a cosmetic issue. Do not weld, drill, grind, or straighten a jack plate unless the manufacturer authorizes the repair.
Check Engine and Transom Fasteners
There are two critical joints: the jack plate to the transom and the outboard to the jack plate. Clean each accessible nut, bolt head, washer, and surrounding surface. Look for movement marks, fretting, rust staining, elongated holes, crushed washers, failed locking features, and sealant problems at the transom.
SeaStar’s manual calls for checking transom and engine bolts after the first use and every 100 hours or six months thereafter, whichever comes first. Torque values and hardware requirements come from the current jack-plate, engine, and boat instructions. Do not copy a torque from another installation.
Use a calibrated torque wrench only when the specified procedure permits an in-place torque check. Repeatedly tightening a fastener can damage threads, compress a transom, or disturb sealant. A bolt that turns, a washer that sinks into fiberglass, or a transom that flexes requires professional evaluation rather than more torque.
Examine Guides, Rods, Rails, and Bushings
Extend the plate only through the manufacturer-approved test procedure and watch both sides. Guide rods or rails should remain aligned and move without chatter, scraping, or sudden speed changes. Inspect exposed surfaces for pitting, scoring, bent sections, and debris.
Dometic recommends grease on SeaStar guide rods at routine engine-service intervals, but lubricant requirements are model-specific. Some plates use composite bushings or dry-running surfaces that should not receive an arbitrary grease. Clean first, then apply only the named lubricant in the named quantity and location.
Excess grease can hold grit and obscure a leaking seal. Wipe off residue as directed and keep lubricant away from electrical connectors, anodes, and friction surfaces.
Inspect the Actuator and Hydraulic Components
On a hydraulic plate, inspect the actuator body, shaft, seal area, fittings, hoses, and integrated pump housing. Look for dampness, oil tracks, damaged plating, cracked fittings, chafed hose, swelling, or a shaft coated with dirt stuck to fluid.
Do not assume that gradual movement during long-term storage proves a simple fluid shortage. Internal leakage, external leakage, trapped air, valve problems, or an installation issue may require model-specific diagnosis. Never open a hydraulic fitting to “bleed it” without the manufacturer’s procedure.
Cycle the plate and then hold it at a safe test position while watching for unexpected drift. If the manufacturer’s test limits are unavailable, do not invent one. Record the symptom and consult a qualified technician.
Inspect Electrical Power and Controls
Powered plates draw substantial current through a motor, relays or solenoids, harness, and circuit protection. Inspect the visible wiring for chafe, crushed insulation, heat discoloration, loose support, corrosion, and water entry. Confirm that boots, loom, and strain relief remain intact.
Check the control switch for immediate, correct response. The SeaStar manual tells operators to verify UP and DOWN response before every use. A reversed switch, intermittent relay, slow motor, or jumping position gauge is a diagnostic clue—not a reason to keep cycling the plate.
Use the wiring diagram and specified circuit protection for the exact model. Do not bypass relays, substitute a fuse size, or energize exposed conductors. Corroded high-current connections can overheat even when the plate still moves.
Perform a Full Clearance Check
Clearance must be checked through the combined ranges of jack-plate travel, engine trim and tilt, and steering. A safe position at center steering may interfere at full port or starboard lock.
Watch:
- steering cylinders, tie bars, and link arms;
- hydraulic steering hoses and fittings;
- fuel, electrical, control, and data cables;
- the rigging tube or boot;
- transom caps, splashwell edges, swim platforms, and ladders;
- shallow-water anchors and mounting brackets; and
- the outboard cowling and lower pan.
Dometic requires clearance checks among the plate, steering system, hoses, and engine components. Do not attempt to steer with the engine at full tilt if the manufacturer prohibits it. Stop immediately if a hose stretches, a fitting contacts metal, or the engine approaches the transom.
Verify Travel and Listen for Changes
Reconnect power only when the area is clear. Operate the plate through its approved range while observing both sides from a safe location. Movement should begin promptly and remain even. Listen for grinding, knocking, hydraulic squeal, relay chatter, or a motor that slows at a repeatable point.
Compare left and right gaps and confirm the plate stops where expected. A manual plate should adjust and lock only by its manufacturer’s procedure; never loosen it while the engine load is unsupported.
During an on-water test, engine height must not compromise cooling-water pressure. Dometic warns that raising an outboard too high can reduce water pressure and overheat the engine. Use the engine’s approved water-pressure and temperature monitoring guidance, and never tune height by speed alone.
Inspect Corrosion Protection
Some plates provide a dedicated anode pocket. Inspect the installed anode for secure contact, correct material, and consumption. Replace it using the plate manufacturer’s specification. Do not paint the anode or its electrical contact surfaces.
An anode is not a substitute for rinsing, correct bonding, compatible fasteners, or isolating dissimilar metals. Investigate rapid anode loss, bubbling coatings, white aluminum corrosion, or repeated staining rather than simply replacing the anode more often.
Put the Plate in the Correct Storage Position
Follow the exact storage guidance for the plate and boat. SeaStar’s hydraulic jack-plate manual says the system should not be relied on for long-term support and directs that, during storage or trailering, the outboard be in the lowest vertical position and/or a trim position that avoids interference.
That instruction may not apply word-for-word to another design. Manual, electric, and externally pumped plates can have different support and storage procedures. Use an approved lock or support where required; never improvise with lumber, straps, or a tool placed in the slide.
After positioning, isolate power if the manual calls for it, protect connectors, and ensure the engine and rigging cannot contact the cover or structure as temperatures change.
End-of-Season Checklist
- Record the jack-plate model, setback, rating, and serial number.
- Rinse with fresh water and avoid unapproved corrosive cleaners.
- Inspect brackets, side plates, guides, actuator, seals, and stops.
- Check for leaks, binding, cracks, deformation, and uneven wear.
- Verify plate-to-transom and engine-to-plate fasteners by the approved method.
- Inspect the transom around the mounting area.
- Inspect harnesses, relays, switch response, circuit protection, and strain relief.
- Check all steering and rigging clearances through the approved movement range.
- Service guide rods only with the specified lubricant.
- Inspect the correct anode and its contact.
- Place the engine and plate in the manufacturer-approved storage position.
- Use the approved long-term support method where required.
Record the Work in BoatDuty
Record the inspection date, engine hours, plate manufacturer and model, setback, fastener specifications, torque-check procedure, lubricant used, anode type, electrical findings, travel symptoms, and storage position. Add photos of mounting hardware, guide surfaces, and rigging clearance.
BoatDuty can keep that record with the boat’s engine and steering maintenance history. Tracking travel time, drift, leakage, or recurring loose hardware makes gradual change easier to recognize and gives a technician better evidence than a general note that the plate “seems slow.”
Sources
- Dometic SeaStar, SeaStar Hydraulic Jackplate & SeaStar Jackplate Xtreme Installation and Owner’s Manual (Revision C, 2021)
- Dometic, “Do You Really Need a Jack Plate?” (maintenance, freshwater washdown, and guide-rod lubrication)
- Dometic, “SeaStar Jackplates” (function, setback, and clearance considerations)
- Dometic, “Marine Steering & Control FAQ” (jack-plate operating and diagnostic topics)