

Outboard cowling maintenance before storage is more than a cosmetic wash. The top cowling and its lower seal help protect the powerhead while still allowing the engine's designed airflow. Latches and hooks keep the cover seated at speed, and the fit around the lower pan helps manage spray and rain. A damaged seal, misaligned latch, blocked opening, or incorrectly installed cover can expose expensive components to water and corrosion.
Cowling designs vary by brand, model, and horsepower. Some use one rear latch; others use front, rear, or side latches and fixed hooks. Seals, intake paths, drains, sound insulation, and approved protectants also differ. Use the engine's serial number or primary ID to obtain the correct owner's manual before adjusting hardware or applying any chemical under the cover.
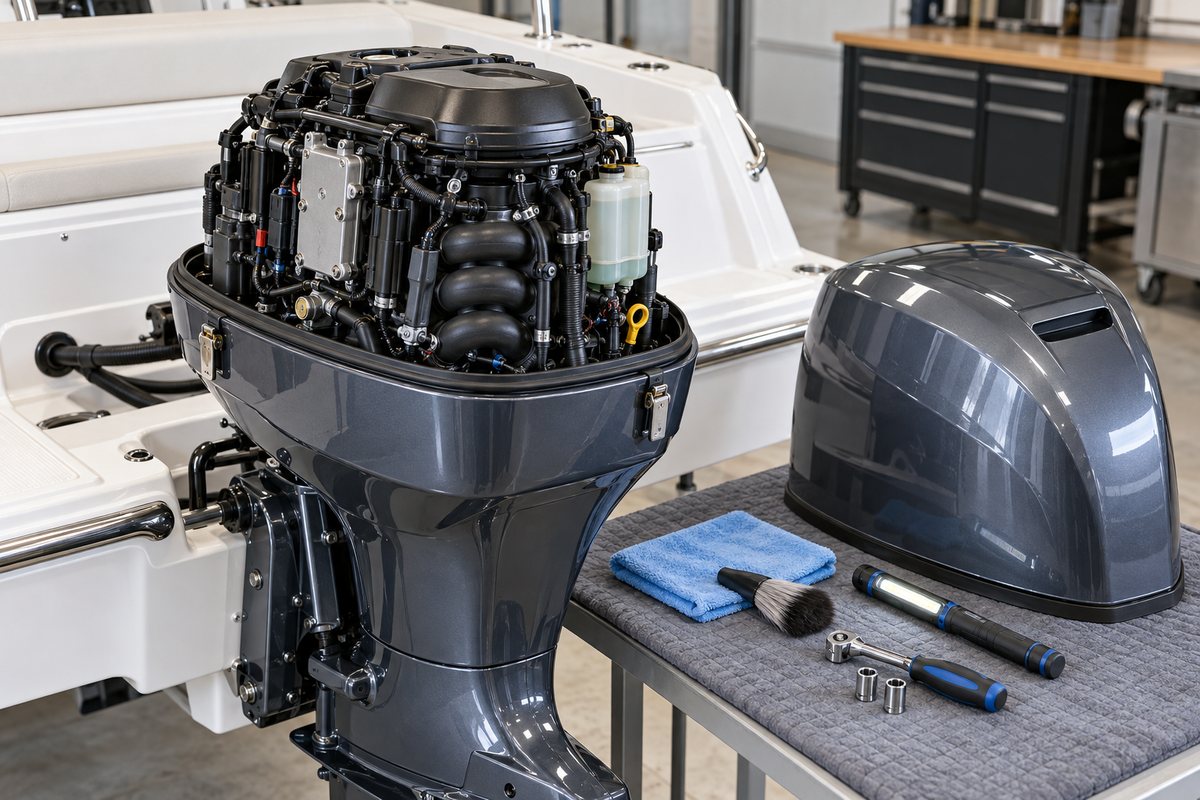
Make the Engine Safe and Cool
Shut the engine down, remove the key, and disable accidental starting according to the owner's manual. Allow the powerhead and exhaust components to cool fully. If the boat is ashore, support and position the outboard as the manufacturer directs. Do not rely on a hydraulic trim system alone when the manual requires a mechanical support for service.
Before releasing the latches, note how the cowling sits. Check the gap around the lower edge, the relationship between latch handles and hooks, and whether one corner appears higher than the others. Photograph anything that looks uneven. A baseline makes it easier to identify a seal that is out of position or a latch that is no longer pulling the cover down evenly.
Clean the Exterior Without Scratching the Finish
Loose grit can scratch a glossy cowling if it is wiped dry. Mercury's cowling-care guidance calls for rinsing away dirt and dust before washing, while Yamaha recommends fresh water, a soft cloth, and a mild cleaner for the exterior. Work in the shade when possible and follow the finish-care instructions for the specific engine.
Avoid strong household cleaners, abrasive pads, dry rubbing, and unapproved solvents. A product that is safe on a fiberglass hull may haze graphics, attack molded plastic, soften adhesive, or affect a rubber seal. Rinse thoroughly and dry with a clean, soft cloth.
While cleaning, inspect the exterior for:
- Cracks around corners, vents, handles, and latch mounting points
- Loose trim, badges, sound insulation, or internal retainers
- Deep scratches or chips that expose underlying material
- Distortion that prevents the cowling from sitting flat
- Damaged intake grilles or missing fasteners
- Water trapped where the design should drain freely
Do not drill a new drain or enlarge an opening because water is present. First confirm the intended intake and drainage path in the model's documentation.
Remove and Support the Cowling Correctly
Release each latch in the sequence shown in the owner's manual. Lift the cover using its designed handholds or lifting points and avoid twisting it against a fixed hook. A large cowling can be bulky even when it is not especially heavy. If it cannot be removed and replaced without striking the engine or boat, get assistance rather than forcing the hardware.
Place the cowling on a padded, stable surface where its painted finish, edge, seal, and insulation cannot be damaged. Do not set it on a latch handle, air intake, loose tools, or a gritty floor.
Inspect the Cowling Seal Around the Entire Perimeter
Follow the rubber seal from end to end. Depending on the design, it may stay on the lower pan, attach to the cowling, or use molded corners and joints. Look for:
- Cuts, splits, missing sections, or torn corners
- Flattened areas that no longer rebound
- Swelling, waviness, stretching, or a seal that has grown out of its groove
- Hardened, sticky, or powdery rubber
- Debris, fishing line, leaves, salt, or grit trapped on the sealing surface
- A joint that has separated or a seal that is no longer fully seated
- Uneven compression marks suggesting poor cowling alignment
Yamaha owner documentation warns that a damaged or incorrectly seated rubber seal can allow water into the cowling and, on applicable models, contribute to the cowling coming loose at speed. Clean the seal and mating surface with methods approved for the engine. Do not pull the seal out merely to clean beneath it unless the manual provides that procedure.
Chemical advice must remain model-specific. Yamaha maintenance guidance recommends an approved silicone protectant for its cowling seal, but that does not make every silicone or corrosion spray safe for every outboard. Some chemicals can swell certain elastomers or contaminate belts and sensors. Use only the product and application method approved for the engine, and keep spray away from excluded components.
Check Latches, Hooks, Pins, and Mounting Points
Inspect every part that locates or retains the cowling. Operate each latch slowly while watching how it moves. A good latch should move through its designed travel and hold its position without improvised wire, tape, or excessive force.
Look for:
- Corroded pins, springs, brackets, and fasteners
- Cracked plastic handles or distorted metal levers
- Loose mounting screws, worn pivots, or elongated holes
- Bent hooks or strike points
- A latch that does not fully engage
- Polished wear marks showing that parts are rubbing out of alignment
- Uneven tension from one side to the other
Do not bend a hook, add washers, or shorten a latch rod to create more clamping force unless the service procedure specifically calls for that adjustment. Excess force can crack the cowling or crush the seal without correcting the underlying alignment problem. Honda's owner documentation identifies the engine-cover latch but directs service beyond normal owner procedures to the applicable shop manual or dealer. That is a useful boundary when a latch is damaged or needs adjustment.
Use only model-approved lubricant, and only at the specified points. Keep excess lubricant off the sealing surface, belts, pulleys, electrical connectors, and air intake.
Inspect the Lower Pan, Air Openings, and Drain Paths
With the cowling removed and the engine cool, inspect the lower pan and accessible channels. Remove loose leaves, insect nests, salt deposits, and dirt without pushing debris deeper into an intake or electrical area. Use a soft brush, vacuum, or another method permitted by the owner's manual.
Check that molded drains and passages are open where the design makes them visibly serviceable. Do not direct high-pressure water or compressed air into intake openings, connectors, sensors, or hidden cavities. If water repeatedly pools inside the lower pan, investigate the source rather than treating the puddle as a normal maintenance item.
Also examine the mating flange for cracks, loose hardware, damaged bumpers, and anything that would hold the cowling above the seal. A misplaced harness, hose, tool, or rag can prevent correct seating and may be damaged when the cover is latched.
Protect the Powerhead Without Overspraying
The storage inspection is a good time to check the visible powerhead for salt residue, corrosion, loose clips, chafed wiring, or fluid leakage. Yamaha recommends approved corrosion protection on applicable powerheads and specifically cautions against spraying silicone on oxygen sensors. Other manufacturers may identify additional no-spray areas such as belts, pulleys, sacrificial anodes, intake components, or particular seals.
More spray is not automatically better. Follow the product label and the engine manual, use controlled application, and wipe excess where directed. Never use a protectant to hide active leakage, overheated wiring, or advancing corrosion that needs repair.
Reinstall the Cowling and Verify the Fit
Before installation, confirm that tools and cleaning materials are clear of the engine. Inspect the seal one more time and make sure it is seated in its intended groove. Align fixed hooks or locating tabs first, then lower the cowling without dragging it across the seal.
Engage the latches in the specified sequence. Walk around the engine and verify:
- The lower edge sits evenly on all sides
- The seal is not pinched, rolled, or protruding
- Every latch is fully engaged
- Handles return to their normal locked positions
- No harness, hose, insulation, or tool is trapped
- The cowling does not rock or lift when checked gently
If the cowling needs to be pushed, struck, or pulled sideways to latch, stop and find the obstruction or alignment problem. Do not operate the boat with a doubtful latch, damaged seal, or loose-fitting cover.
Storage and Spring Recommissioning
Unless the engine manufacturer says otherwise, reinstall and latch the cowling for storage so the seal remains in its designed position and the powerhead is protected. Avoid wrapping the engine in a way that traps moisture or blocks ventilation required by the storage instructions. Follow the owner's manual for engine angle, flushing, battery isolation, fuel-system preparation, and other storage steps; those procedures are separate from cowling maintenance.
In spring, repeat the fit check before the first start. Confirm that rodents or insects have not damaged insulation, wiring, hoses, or intake openings. After the first outing, verify that the cowling remains secure and that no water or fresh wear marks have appeared inside.
Outboard Cowling Maintenance Checklist
- Obtain the correct owner information using the engine ID or serial number
- Shut down, disable starting, and let the engine cool
- Photograph uneven gaps or latch alignment before removal
- Rinse loose grit before washing the exterior
- Inspect the shell, vents, trim, insulation, and mounting points
- Support the removed cowling on a clean padded surface
- Inspect the complete seal for damage, swelling, hardening, and displacement
- Clean the seal and mating flange only with approved methods
- Inspect latches, hooks, pivots, springs, and fasteners
- Clear accessible debris from intended air and drain paths
- Apply only model-approved corrosion protection and lubricant
- Reinstall the cowling with the seal fully seated
- Confirm all latches engage and the cover fits evenly
Record the Work in BoatDuty
In BoatDuty, record the inspection date, engine hours, engine model or ID reference, seal condition, latch findings, cleaning and protection products used, part numbers, photos, and repairs. If a gap, crack, or wear mark is being monitored, photograph it from the same angle at each service. That creates a useful trend instead of relying on memory next season.
A short record also prevents incompatible products from being mixed later. Note exactly what touched the painted shell, rubber seal, latch hardware, and powerhead.