

Marine watermaker winterization is more than pumping pink antifreeze through a hose. A reverse-osmosis system can be damaged by biological fouling when seawater sits inside it, by freezing water trapped in low points, by chlorine reaching a vulnerable membrane, or by an incompatible storage chemical. The correct layup procedure depends on the watermaker model, its membrane and pump design, the expected storage period, and the lowest temperature the boat may experience.
Not every boat has a watermaker, and the systems that do exist are not interchangeable. This article provides a planning and inspection framework, not a universal chemical recipe. Use the current manual for the exact model and follow its quantities, valve positions, pressure-relief steps, preservatives, filter instructions, circulation time, freeze-protection concentration, and restart procedure.
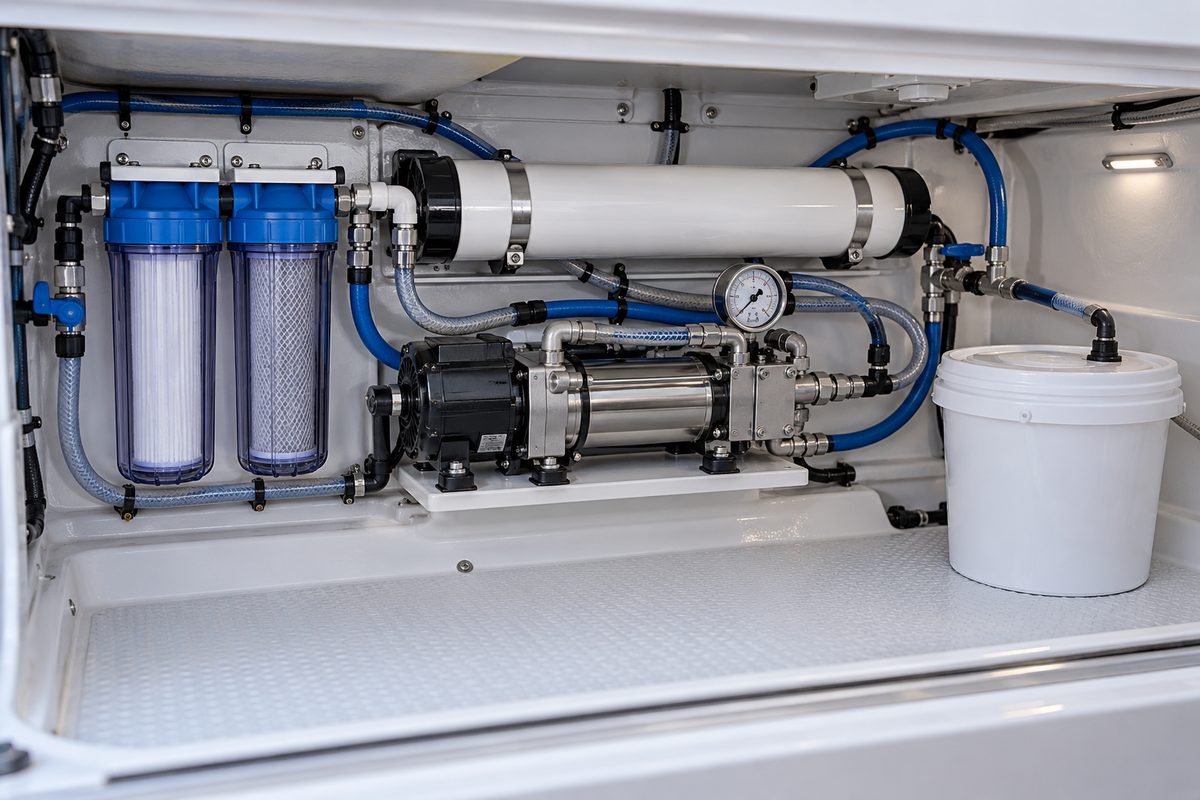
Understand What You Are Preserving
A typical marine watermaker draws seawater through an intake and strainer, moves it through one or more prefilters, pressurizes it with a high-pressure pump, sends the flow across a reverse-osmosis membrane, and separates product water from brine. Installed systems may add boost pumps, automatic freshwater flushing, carbon filters, salinity sensors, diversion valves, remote controls, and service or pickling ports.
The membrane is central to layup, but it is not the only concern. Water can remain in filter housings, pump heads, tubing, gauges, valves, and drain loops. A preservation procedure must reach the components named in the manual while keeping the system unpressurized if that is required.
Before service, isolate electrical power using the boat’s approved shutdown procedure, close or position seacocks as the manual directs, and relieve pressure. Never loosen high-pressure fittings on a pressurized system. If the procedure requires operating pumps or valves, restore power only for the specified step and keep discharge hoses controlled.
Storage Time and Temperature Change the Procedure
Manufacturers use different thresholds. Rainman’s electric-watermaker guide provides one model-family example: no treatment for up to two days idle, a freshwater flush for two to seven days, and pickling for seven to thirty days; for more than thirty days it also calls for discarding the prefilter and draining its housing. Those intervals should not be applied to another brand.
Spectra’s January 2024 Ventura 150/200T manual distinguishes a storage chemical from freeze protection. It says its SC-1 treatment prevents biological growth but does not protect against freezing, while approved propylene glycol can provide storage and freeze protection when mixed and circulated as specified. Even within one brand, optional systems such as automatic flushing or ion-based preservation can change the procedure.
Decide the layup plan from three facts:
- expected time out of service;
- lowest realistic ambient temperature at the equipment, not merely the regional average; and
- exact watermaker model and installed options.
Build in margin. A boat planned to be idle for a week may remain blocked ashore for months, and a heated storage building can lose power.
Establish a Baseline Before Shutdown
If the system is operating normally and water conditions are suitable, record a final performance baseline before layup. Use the manufacturer’s test method and calibrated instruments where required. Useful observations may include:
- engine or system hours;
- feed pressure and high pressure at a defined operating condition;
- product-water flow;
- brine flow, if the manual measures it;
- product-water salinity or total dissolved solids after stabilization;
- intake-water temperature and salinity;
- prefilter condition and differential-pressure indication; and
- leaks, unusual noise, vibration, pulsation, or heat.
Do not use storage day to conceal an existing fault. Low output, abnormal salinity, oily intake contamination, repeated pump cycling, or a leaking high-pressure component should be diagnosed according to the manual. Membrane cleaning is not automatically part of winterization; Spectra specifically cautions against unnecessary cleaning because it can shorten membrane life.
Use Clean, Compatible Fresh Water
Most layup sequences begin with a freshwater flush, but the required water quality matters. Many thin-film composite membranes can be damaged by oxidants such as free chlorine. Some systems route tank water through a carbon filter before it reaches the membrane; other procedures call for product water or explicitly dechlorinated water.
Confirm that the carbon filter, if fitted, is within its service life and installed in the correct direction. Do not assume that marina water, household bleach-treated water, or a potable-water tank automatically meets the membrane maker’s requirements. Follow the system manual’s water source, volume, flush duration, valve positions, and pressure setting.
During flushing, inspect the intake circuit, prefilter housings, pump, pressure vessel connections, product line, and brine line for leaks. A small seep that evaporates during summer operation can leave a fitting wet for an entire storage season.
Preserve the Membrane With the Specified Chemical
“Pickling” is controlled preservation of the wetted system using a manufacturer-approved solution. The chemical and concentration are model-specific. Rainman documents sodium metabisulfite for its applicable procedures and warns against exceeding its specified concentration. The Spectra Ventura manual, by contrast, warns against using storage chemicals supplied for other brands because incompatible chemistry can damage its Clark Pump and void coverage.
That difference is the essential lesson: never substitute a generic recipe found online.
Use the exact product, fresh water, measuring method, and personal protective equipment named in the manual and chemical safety information. Mix in a clean container made of compatible material. Keep powders dry until use, avoid inhaling dust or fumes, prevent splashes, and dispose of spent solution according to the product instructions and local rules. Do not discharge a concentrated preservative casually into the water.
The service hoses and bucket must be clean. Keep hose ends off dirty decks, label them, and cap them after drying. A storage procedure should not introduce oil, detergent, sediment, or microorganisms into the membrane circuit.
Keep the System Unpressurized During Service Circulation
Many watermakers require the pressure-control or relief valve to be fully open during freshwater flushing, preservation, and winterization. That lets the feed pump circulate solution without creating normal reverse-osmosis operating pressure. The Spectra Ventura manual warns that its relief valve must remain open during chemical service to avoid membrane damage.
Verify valve position before starting the pump, watch the correct discharge hose, and stay with the system. Never dead-head a pump. Stop immediately if a service hose collapses, a bucket empties, pressure rises unexpectedly, flow stops, or a leak appears.
Circulate for the precise time required by the manual. More chemical, higher concentration, or longer circulation is not automatically better. At completion, leave each valve, seacock, electrical control, and hose in the documented storage position. Attach a clear “preserved—do not operate” tag to the controls.
Protect Against Freezing Without Guessing at Concentration
If freezing is possible, biological preservation alone may not protect the unit. Some manufacturers specify approved propylene-glycol potable-water antifreeze; others may specify draining, air purging, a proprietary winterizing fluid, or a different sequence. Automotive ethylene-glycol antifreeze is toxic and is not a substitute.
The concentration printed on an antifreeze jug does not necessarily equal the concentration left inside the watermaker. Residual water dilutes the solution. Spectra’s Ventura manual explicitly accounts for dilution and recommends a stronger starting formulation for that system. Use the exact concentration and quantity given for your model and expected temperature.
Do not use compressed air unless the manufacturer provides a pressure limit and procedure. Unregulated shop air can damage filters, gauges, tubing, valves, and membrane vessels or leave hidden pockets untreated.
Manage Prefilters, Housings, and Damp Lockers
Storage instructions for prefilters vary. A manufacturer may tell you to replace a dirty element before flushing, remove and discard it for long storage, drain the housing, or leave an approved solution in place. Rainman notes that organic debris trapped in a prefilter can continue decomposing and calls for discarding the element and draining the housing for storage longer than a month in its applicable systems.
After the prescribed process, wipe external surfaces dry. Inspect housing bowls for cracks, clouding, thread damage, and distorted O-rings. Lubricate O-rings only with the product approved by the housing or system maker; petroleum grease can damage some elastomers.
Ventilation matters. Rainman warns that seawater or pickling solution in a closed, damp locker can create a highly corrosive environment even around 316 stainless steel. Store unused chemical and mixed solution where the product instructions allow, not beside the equipment in a sealed machinery space. Correct leaking lids, dripping hoses, and blocked locker drains.
Inspect the Rest of the Installation
Layup is a good time to examine components that are difficult to see while cruising:
- intake strainer screen, bowl, seal, and seacock linkage;
- boost-pump or feed-pump mount, wiring, fuse, and hose support;
- prefilter housings, brackets, pressure gauges, and vacuum indicators;
- high-pressure-pump oil level and service interval, if the design uses oil;
- membrane-vessel straps, end caps, and high-pressure fittings;
- product-water diversion and salinity-sensor plumbing;
- brine and product lines for chafe, kinks, unsupported weight, and leaks;
- carbon-filter date and the freshwater-flush circuit;
- electrical terminals, controller faults, and automatic-flush power supply; and
- service hoses, caps, tools, spare O-rings, filters, and approved chemicals.
Do not tighten high-pressure fittings by feel. Use published torque values and procedures, or assign the repair to a qualified technician. A hose that shows abrasion, blistering, exposed reinforcement, damaged fittings, or recurring leakage should be replaced with the specified assembly.
Recommission Methodically
Preservative and antifreeze must be flushed out before product water enters the boat’s tank. Follow the manufacturer’s restart sequence, including valve positions, unpressurized flushing, filter installation, air purging, and minimum discard time. Spectra notes that propylene glycol can require extended flushing from its membranes after storage; other systems differ.
Route initial product water to a test or discard outlet. Do not rely on taste alone. Use the salinity display or a suitable handheld meter as directed, verify stable product quality, and inspect every serviced joint under operating conditions. Sanitize the boat’s freshwater tank separately if its manual calls for it; do not send a tank-sanitizing solution through the watermaker unless the watermaker maker explicitly permits it.
Restore automatic-flush schedules only after confirming fresh-water supply, carbon filtration, electrical power, and overboard discharge are ready. Review the control tag and remove it only when the system is fully recommissioned.
Marine Watermaker Winterization Checklist
- Identify the exact model, serial number, options, and current manual.
- Record expected storage duration and minimum equipment-space temperature.
- Log a final performance baseline and unresolved faults.
- Shut down, isolate, and depressurize the system safely.
- Verify the approved fresh-water source and carbon-filter condition.
- Flush using the specified volume, time, and valve positions.
- Mix only the approved preservative at the stated concentration.
- Keep the system unpressurized during service circulation when required.
- Add model-approved freeze protection if temperatures demand it.
- Service or remove prefilters exactly as instructed.
- Dry and ventilate the equipment space; store chemicals separately.
- Tag controls and record every storage valve and switch position.
- Inspect pumps, vessels, hoses, wiring, gauges, mounts, and service gear.
- Recommission with the specified purge, discard, and quality tests.
Record the Work in BoatDuty
Create a BoatDuty service entry with the watermaker model and serial number, system hours, baseline pressure and output, product-water reading, storage date, expected restart date, prefilter and carbon-filter part numbers, preservative or antifreeze product, batch or lot if available, concentration, quantity, circulation time, valve positions, and any leaks or repairs. At recommissioning, log the purge duration, new filter details, stabilized water-quality reading, and post-start inspection. These details turn next season’s restart into a repeatable service procedure rather than a chemical-memory exercise.
Sources
- Spectra Watermakers, Support — Manuals and Downloads
- Spectra Watermakers, Ventura 150/200T Installation and Operating Manual, updated January 2024
- Rainman Desalination, Electric Watermaker Operations Guide
- Rainman Desalination, Electric Watermaker Operations Manual
- Rainman Desalination, Framed Watermaker Operations Guide
- Rainman Desalination, Desalination FAQs