

A marine toilet joker valve is small, inexpensive, and easy to overlook, yet it helps keep discharged waste from flowing back toward the bowl. The nearby discharge elbow, sanitation hose, clamps, and connections matter just as much. A restriction, tired valve, loose clamp, or permeated hose can produce slow flushing, backflow, odor, or a leak in a compartment that is difficult to clean.
Inspecting this part of the sanitation system before storage creates time to correct problems before winterization and avoids leaving waste trapped in a hose for months. This guide focuses on the discharge side of common manual marine toilets. Electric and vacuum toilets may use different valves, pumps, and service procedures, so use the toilet manufacturer’s current manual and parts diagram for the exact model installed on your boat.
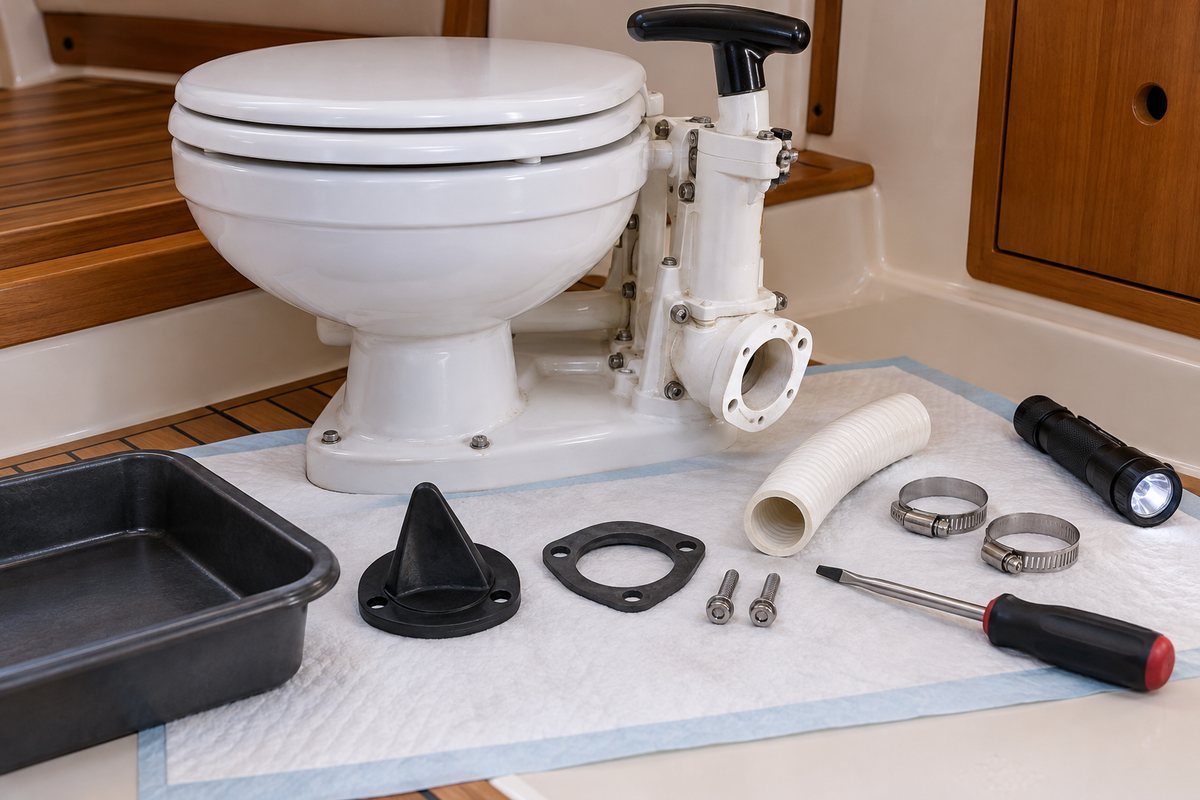
What the joker valve does
In many manual marine toilets, the joker valve sits in the discharge elbow at the base of the pump. Its flexible lips open as waste is pumped out and then relax toward a closed position. That one-way action limits return flow, but it is not a permanent shutoff valve and does not replace properly installed seacocks, vented loops, holding-tank plumbing, or other required safeguards.
Age, mineral buildup, debris, harsh cleaners, or prolonged deformation can prevent the valve from closing. Xylem’s Jabsco service guidance identifies backflow into the bowl as a reason to inspect the valve. Its demonstration also shows a healthy valve with lips that remain mostly closed; a valve with an obvious open gap should be replaced. Those observations apply to the models covered by that guidance, not automatically to every marine toilet.
The discharge hose carries every pump stroke away from the toilet. Even a new joker valve cannot compensate for a kinked hose, a blocked vent, an overfilled holding tank, or incorrect plumbing geometry.
Recognize the early warning signs
Schedule an inspection if you notice any of these symptoms:
- Liquid slowly returns to the bowl after pumping it dry
- The pump handle becomes harder to operate or the discharge stroke feels restricted
- Flushing takes more strokes than usual
- Odor persists after the bowl and surrounding surfaces are cleaned
- A connection shows dampness, staining, salt residue, or corrosion
- A hose is flattened, kinked, cracked, swollen, unusually hard, or soft and spongy
- A clamp has shifted, loosened, or cut into the hose cover
These symptoms are clues, not a diagnosis. For example, difficult pumping can result from a blocked hose or closed valve, while odor can come from stagnant intake water, a tank vent problem, a leak, or hose permeation. Trace the system and confirm the cause instead of replacing parts at random.
Make the system safe before opening it
Sanitation work deserves deliberate preparation. Wear appropriate eye protection and disposable gloves, ventilate the compartment, and keep disinfecting supplies and a catch pan nearby. Follow local rules for handling and disposing of waste and contaminated materials.
Before disconnecting a hose or opening a discharge elbow:
- Pump or flush the system thoroughly as the toilet manual directs so the bowl and discharge path contain as little waste as possible.
- Empty the bowl.
- Close both the intake and discharge seacocks if the installation has them. Jabsco’s manual instructs owners to close both seacocks before servicing and warns that open seacocks can create a flooding risk.
- Isolate electrical power at the proper breaker or fuse if the boat has an electric toilet or macerator.
- Protect nearby finishes and position a shallow catch pan for residual liquid.
- Photograph hose routing, clamp positions, vented loops, and fitting orientation before disassembly.
If the boat remains afloat, treat every below-waterline hose as a potential flooding path. Do not leave a disconnected hose unsecured, and never rely on the toilet’s internal valves as substitutes for a functioning seacock.
Identify the exact toilet and replacement part
Record the manufacturer, model, serial information, and pump style before ordering a joker valve. A similar-looking rubber part may have different dimensions, material, lip geometry, or flange details.
For example, Xylem identifies Jabsco part 29092-1000 for specific 29090- and 29120-series manual toilets in its service video. That part number is not a universal marine-toilet specification. Confirm the correct valve, gasket, O-ring, hose size, and fasteners in the current parts list for your model.
Also check whether the manufacturer calls for a complete service kit rather than a single valve. If the pump is leaking, stiff, or overdue for overhaul, treating the entire service interval as one planned job may be more efficient than opening the system repeatedly.
Inspect the discharge elbow and joker valve
Follow the model-specific sequence for removing the discharge elbow. Expect retained liquid even after a thorough flush. Support the hose so its weight does not lever against a plastic fitting.
Once the elbow is accessible, inspect it for:
- Cracks around screw holes, clamp lands, or molded bends
- Distortion caused by overtightened clamps or fasteners
- Mineral scale, foreign material, or hardened residue narrowing the passage
- Damaged sealing faces, gaskets, or O-rings
- Fasteners with corrosion, stripped threads, or mismatched replacements
Remove the joker valve as the manual directs and note its orientation before cleaning the surrounding fitting. Replace a valve with torn, hardened, swollen, permanently open, or visibly damaged lips. Do not trim the lips or try to restore them with heat, oil, or an unapproved chemical.
Use only cleaning products permitted by the toilet manufacturer. Jabsco cautions against aggressive chemical agents, including some thick liquid cleaners, bleach, solvents, and strong acids, because they can damage plastics, valves, gaskets, and seals. A household product that appears harmless on porcelain may be unsuitable for the pump assembly.
Examine the sanitation hose and clamps
Inspect the entire accessible discharge hose, not only the first few inches. Use a light to examine hidden bends, bulkhead penetrations, support points, and low areas where liquid can remain.
Look and feel for:
- Abrasion where the hose touches structure or another hose
- Sharp bends, kinks, flattening, or unsupported weight
- Cracking at the end of a fitting
- Bulges, softness, hardening, or surface checking
- Rust trails or loose hardware at clamps
- Wetness or staining beneath a connection
- Persistent odor concentrated along the hose rather than at a fitting
Odor by itself does not prove that a hose has permeated. Clean and dry the area, confirm that clamps and fittings are leak-free, and use the hose manufacturer’s diagnostic guidance. If replacement is required, use sanitation hose approved for the application and the size specified by the equipment manufacturer. Avoid forcing an undersized hose onto a plastic fitting or compressing an oversized hose with extra clamp pressure.
Where two clamps are specified and the fitting has enough barb length, orient their screws for access without stacking the worm housings on top of each other. Not every fitting is long enough for two clamps, so follow the installation drawing rather than adding hardware by habit.
Reassemble without damaging plastic components
Clean the sealing surfaces and install the correct new valve and seals in the documented orientation. Refit the discharge elbow and hose without twisting the assembly. Replace any clamp with damaged threads, a distorted band, or corrosion that compromises its strength.
Tighten fasteners and clamps to the manufacturer’s instructions. More force is not better: excessive torque can crack a plastic elbow, distort a hose, or pull a fitting out of alignment. Confirm that the hose is supported and that normal movement of the toilet or nearby equipment cannot chafe it.
When reassembly is complete, restore the system in a controlled sequence. Open only the valves required for the test, restore power if applicable, and flush with clean water as the manual directs. Watch every disturbed joint through several cycles. Check the bowl after a short wait for unwanted return flow. Correct any leak immediately, then close seacocks whenever the boat is unattended as the manufacturer recommends.
Prepare for storage the model-specific way
Do not assume that removing the joker valve has winterized the toilet. The bowl, pump, intake line, discharge hose, vented loop, holding tank, macerator, and overboard-discharge plumbing may each retain water. Freezing conditions can damage components or leave concentrated waste in a low point.
Use the boat, toilet, tank, and winterizing-product instructions together. Some procedures require draining and disassembly; others specify pumping an approved propylene-glycol marine/RV antifreeze through particular paths after the system is emptied and rinsed. Never substitute automotive antifreeze, and do not send any product overboard where prohibited. If plumbing routing is unclear, have a qualified marine sanitation technician identify each branch before winterization.
Jabsco’s manual notes that a manual toilet that is properly winterized in autumn and overhauled in spring generally should not require in-season maintenance beyond normal checks. That is useful planning guidance for the covered toilets, but the maintenance interval in your own manual controls.
Record the service in BoatDuty
A sanitation-system record turns next season’s symptoms into useful evidence. In BoatDuty, note the toilet make and model, service date, engine hours if your broader maintenance log uses them, joker-valve and kit part numbers, hose type and size, clamps replaced, observed symptoms, and the winterization method required by the manuals. Add notes about any odor, backflow, restriction, or leak found before and after the work.
That record helps avoid ordering the wrong valve and makes it easier to see whether a repeat symptom is developing sooner than expected. It also gives a future technician a clear starting point without assuming unsupported details about the installation.
Marine toilet discharge-side checklist
- Confirm the toilet make, model, and current parts diagram
- Flush waste from the system and empty the bowl
- Close intake and discharge seacocks
- Isolate electrical power where applicable
- Inspect the discharge elbow, gasket, and fasteners
- Replace a damaged or model-scheduled joker valve
- Inspect the full accessible sanitation-hose run
- Check hose supports, bends, penetrations, and clamps
- Reassemble with model-correct parts and torque guidance
- Test for leaks, restriction, and bowl backflow
- Complete the manufacturer’s storage or winterization procedure
- Record parts, observations, and service date in BoatDuty
A clean bowl is only the visible end of the sanitation system. Giving the joker valve, discharge hose, and connections a careful end-of-season inspection can prevent a small sealing problem from becoming a winter odor, a spring blockage, or a damaging leak.