

A marine shower sump quietly handles soap, hair, lint, and gray water every time the shower or a connected sink drains. That combination makes the sump one of the easiest boat systems to forget—and one of the most likely to develop slow drainage, odors, sticky switches, and freeze damage during storage. A careful marine shower sump maintenance routine before winter can expose worn hoses, clogged strainers, unreliable switches, and trapped water while there is still time to correct them.
The correct procedure depends on the installed system. Some boats use a covered sump box with a small centrifugal pump and float switch. Others use a remote diaphragm pump, sometimes paired with an electronic or flow-sensing strainer. Identify the manufacturer, model, voltage, plumbing layout, and discharge destination before opening anything. Follow that system’s manual whenever it differs from this general guide.
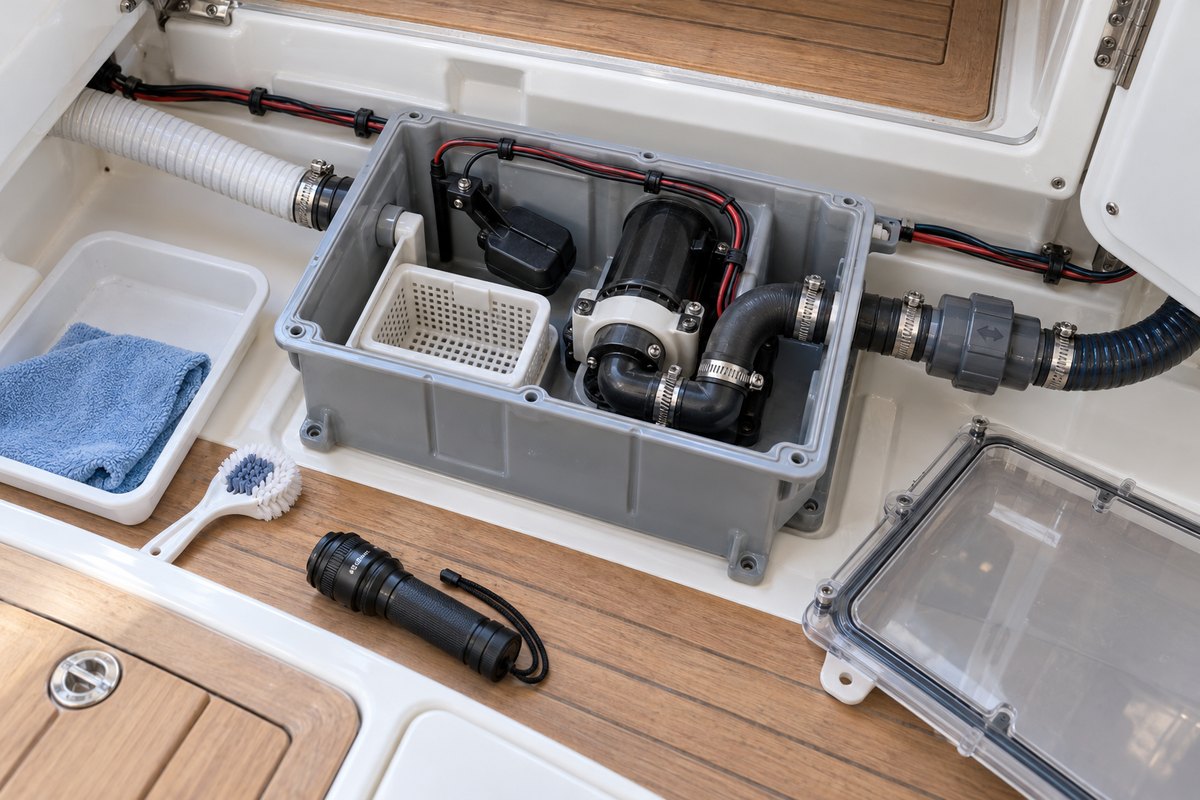
Understand What the Shower Sump Actually Serves
Do not assume the box receives only shower water. Boatbuilders may route a galley sink, head sink, air-conditioner condensate drain, ice-maker drain, or another low-volume gray-water source into the same sump. Before cleaning, trace every inlet you can see and note which fixtures feed the system.
That matters for two reasons. First, a recurring odor or clog may originate upstream rather than inside the box. Second, each connected branch can hold water after the sump appears empty. A complete winter layup addresses the fixtures, hoses, sump, pump, and discharge line—not just the visible basin.
Also confirm where the pump sends the water. Many shower sumps discharge overboard above the waterline, but some installations lead to a gray-water holding tank. Never assume a seacock, check valve, or vented loop is present. Record the actual arrangement and consult the boatbuilder’s plumbing diagram if access is limited.
Start With a Controlled Function Test
If the boat is still in service and the discharge path is safe to use, test the sump before dismantling it. Pour clean water into the shower pan or activate one connected fixture while watching the box through its lid. The system should accept the inflow, start automatically or respond to its manual switch, discharge steadily, and stop without excessive cycling.
Look and listen for:
- Water backing up into the shower pan
- A pump that hums but moves little or no water
- Repeated short cycling after the inflow stops
- A float switch that sticks or requires tapping
- Water spraying from the lid, hose connections, or pump outlet
- A long delay before a remote diaphragm pump primes
- A fuse that opens again after replacement
- New vibration, rattling, or a strained motor sound
Do not continue running a pump that is blocked, leaking, or drawing enough current to open its fuse. A failed fuse is a symptom to investigate, not a larger-fuse problem to solve. Whale’s instructions, for example, direct owners to check for closed valves, blocked ports, debris, reverse polarity, and electrical faults before restoring the specified protection.
Isolate Power Before Opening the Sump
Turn off the shower-sump circuit at its breaker or fuse and confirm the pump cannot start. Automatic pumps can energize as soon as a float or sensor moves. If you will disturb wiring or pump terminals, isolate the relevant battery circuit according to the boat and equipment manuals.
Work only after the compartment has been ventilated and any gasoline-vapor concern has been resolved. Xylem’s Rule manual specifically warns about ignition protection when electrical equipment is installed in spaces that can contain gasoline machinery or fuel-system components. Replacement pumps, switches, and connectors must remain suitable for their installed location.
Wear appropriate eye protection and disposable gloves when handling gray-water residue. Keep absorbent pads and a shallow pan nearby so disconnected hoses do not drain into the bilge.
Clean the Box and Strainer Without Damaging Parts
Remove the lid using the method specified for the model. Current Rule boxes use a serviceable cover and removable strainer, while older boxes may use screws. Inspect the cover for cracks, distorted edges, stripped fasteners, and a flattened or damaged gasket. A lid that no longer seals can let gray water splash into the surrounding compartment when the boat moves.
Lift out the strainer basket and remove hair, lint, labels, and other debris. Xylem instructs owners to clean the strainer periodically to prevent clogging. Wash the basket and accessible box surfaces with warm water and a mild cleaner that the manufacturer permits. Avoid abrasive pads that scratch clear covers or damage sensor surfaces, and do not introduce strong solvents, drain opener, or an unapproved chemical into the pump and hoses.
Wipe the bottom of the box rather than pushing debris toward the pump inlet. A wet/dry vacuum dedicated to service work can be useful if its use is safe in the compartment, but never use electrical cleaning equipment where fuel vapors may be present.
For a remote pump system without a collection box, clean the upstream strainer or sensor housing as directed. Whale advises keeping its intelligent strainer clear of debris and warns against abrasive cleaners. Do not disassemble a sealed motor or electronic section that the manual identifies as non-serviceable.
Inspect the Automatic Switch or Sensor
Box-style systems commonly use a hinged float switch, while newer arrangements may use electronic sensing or a remote intelligent strainer. Soap film can make a mechanical float sluggish even when the pump itself is healthy.
With power still off, move a float gently through its normal travel. It should swing freely without rubbing the box, pump, strainer, or wiring. Check that wiring cannot fall into the mechanism when the lid is installed. Do not bend the arm or force a sealed switch open.
Clean sensor surfaces only with products and methods approved by the manufacturer. After reassembly and power restoration, test automatic operation with clean water. A manual override does not prove that the automatic control works; test both functions when the installation provides both.
Inspect the Pump and Check Valve
On a centrifugal sump pump, inspect the intake area for hair wrapped around the impeller housing and confirm the pump is locked securely into its base or clips. Look for a cracked housing, loose cartridge, swollen seals, corrosion, or evidence that the motor has been sitting partly submerged because the box overflowed.
On a serviceable diaphragm pump, inspect the external pump head, clamp, and hose fittings. If performance has declined, the model manual may permit inspection of valves and the diaphragm for debris, wear, cracks, or loss of flexibility. Do not improvise a teardown. Use the correct service kit and follow the manufacturer’s sequence; a misplaced valve or damaged diaphragm can prevent priming.
Check the discharge check valve if the system has one. A valve held open by hair or grit can allow water to run back into the box, causing repeated cycling and leaving more water trapped for winter. Reinstall it in the correct flow direction. The arrow molded into a fitting indicates flow direction, not hose orientation or electrical polarity.
Examine Hoses, Clamps, and the Discharge Route
Trace each inlet and the discharge hose as far as access allows. Look for:
- Kinks, flattened bends, or unsupported low spots
- Soft, swollen, cracked, or abraded hose
- Loose fittings or residue that marks a slow leak
- Corroded clamps or clamps cutting into the hose
- Chafe where plumbing crosses a bulkhead or equipment edge
- A check valve or vented loop mounted in the wrong orientation
- A discharge outlet blocked by growth, insects, or debris
Hose clamps should be correctly sized and positioned over the fitting’s sealing surface. Do not tighten a clamp until it damages the hose or plastic barb. Replace questionable components with parts suitable for marine gray-water service and compatible with the pump manufacturer’s requirements.
If the system discharges through a seacock, verify its operation and winter position under the boatbuilder’s procedure. Shower-sump plumbing varies too much for a universal valve instruction.
Inspect Wiring and Circuit Protection
Check visible conductors for chafe, unsupported weight, heat damage, brittle insulation, and repairs exposed to moisture. Examine fuse holders, grounds, connectors, and switch leads for green corrosion or looseness. Wiring should be secured so vibration and routine sump cleaning do not pull on pump or switch leads.
Use the fuse size, conductor size, and connection method specified for the exact pump and wire length. Rule publishes wire-sizing and circuit-protection requirements in its manual; those values vary by model, voltage, and total circuit length. A larger replacement pump may require a different circuit design rather than a simple cartridge swap.
If the pump runs slowly, measure voltage at the pump while it is operating and compare the result with the applicable manual. A static battery reading cannot reveal every high-resistance connection. Repairing corroded terminals or undersized wiring is safer than allowing a struggling motor to continue heating.
Drain the Shower Sump for Winter Storage
After cleaning and testing, drain the system according to the equipment and boat manuals. Whale explicitly calls for fully draining its system for winterization. The goal is to remove water from the fixture drains, inlet branches, box or strainer, pump head, check valve, and discharge hose.
Begin with the boat positioned as the builder recommends for drainage. Empty the sump and operate the pump only as allowed for that design. A diaphragm pump may be rated to run dry; many small centrifugal pumps depend on surrounding water and should not be run dry for an extended period. Never apply one manufacturer’s rule to another pump.
Low loops, check valves, and uphill discharge runs can retain water after the basin looks empty. Disconnecting a hose may be required, but only when the manual allows it and the resulting opening can be controlled. Collect residual water and resecure every connection.
Do not pour automotive antifreeze, harsh sanitizer, or an arbitrary chemical into the system. If the boatbuilder specifies non-toxic propylene-glycol plumbing antifreeze for this particular gray-water circuit, use the specified product and method. Some systems are intended to be drained rather than filled. Document what was used so spring commissioning does not become a guessing exercise.
Leave the cleaned box dry. Reinstall the lid loosely or as the manufacturer specifies for storage, taking care not to deform its gasket. Keep the breaker off and label the system if a hose, fuse, or component remains removed for repair.
Spring Recommissioning
Before the first shower of the season, confirm every hose, clamp, electrical connector, fuse, strainer, check valve, and lid is installed. Restore power and test first with clean water. Watch the complete cycle, verify automatic shutoff, inspect for leaks, and confirm water exits at the intended discharge or reaches the correct holding tank.
If antifreeze was used under the boatbuilder’s procedure, flush and dispose of it as required for the product and local rules. Do not send an unknown mixture overboard.
Marine Shower Sump Maintenance Checklist
- Identify the sump or remote-pump model, voltage, and connected drains.
- Confirm the discharge destination and valve arrangement.
- Run a controlled pre-service test with clean water.
- Isolate power before opening the box or handling wiring.
- Remove debris and clean the strainer, box, and approved sensor surfaces.
- Inspect the lid, gasket, pump base, float, check valve, and serviceable pump parts.
- Check hoses for blockage, low spots, cracks, chafe, and leaks.
- Inspect clamps, wiring, grounds, connectors, and the specified fuse.
- Test automatic and manual operation after reassembly.
- Drain every branch, pump cavity, check valve, and discharge line as directed.
- Record any removed parts or spring follow-up work.
Record the Work in BoatDuty
Log the service date, boat engine hours if that is how you schedule seasonal work, sump and pump model numbers, fuse rating, cleaning products used, replaced parts, observed voltage, and winterization method in BoatDuty. Note every fixture connected to the sump and attach a simple description of the hose route. That record makes a future slow drain easier to diagnose and helps prevent a disconnected hose or disabled circuit from being overlooked at launch.
When to Call a Marine Technician
Arrange professional service if the pump repeatedly opens its fuse, wiring is overheated, the installation may require ignition-protected equipment, gray water leaks into inaccessible structure, a through-hull or seacock is questionable, or a remote pump needs internal service beyond its manual. Persistent odor after the sump is clean can indicate a hidden hose, tank, or vent problem that deserves a wider inspection.