

A built-in marine refrigerator can finish the season looking clean while still holding frost behind the evaporator, moisture under a drawer, dust on the condenser, or food residue in a door gasket. Closed up for months, those small problems can become odor, mold, corrosion, poor airflow, and a sticky latch by spring.
Proper marine refrigerator maintenance before winter storage is a controlled shutdown: remove food, disconnect the correct power sources, allow all ice to melt naturally, clean and dry the cabinet, inspect the door and ventilation path, and leave the unit ventilated as its manufacturer directs.
This article focuses on common 12/24-volt compressor refrigerators, including models that also accept AC power through an internal or external supply. Absorption refrigerators, engine-driven cold plates, keel-cooled systems, and water-cooled condensers have different procedures. Always follow the manual for the equipment installed on your boat.
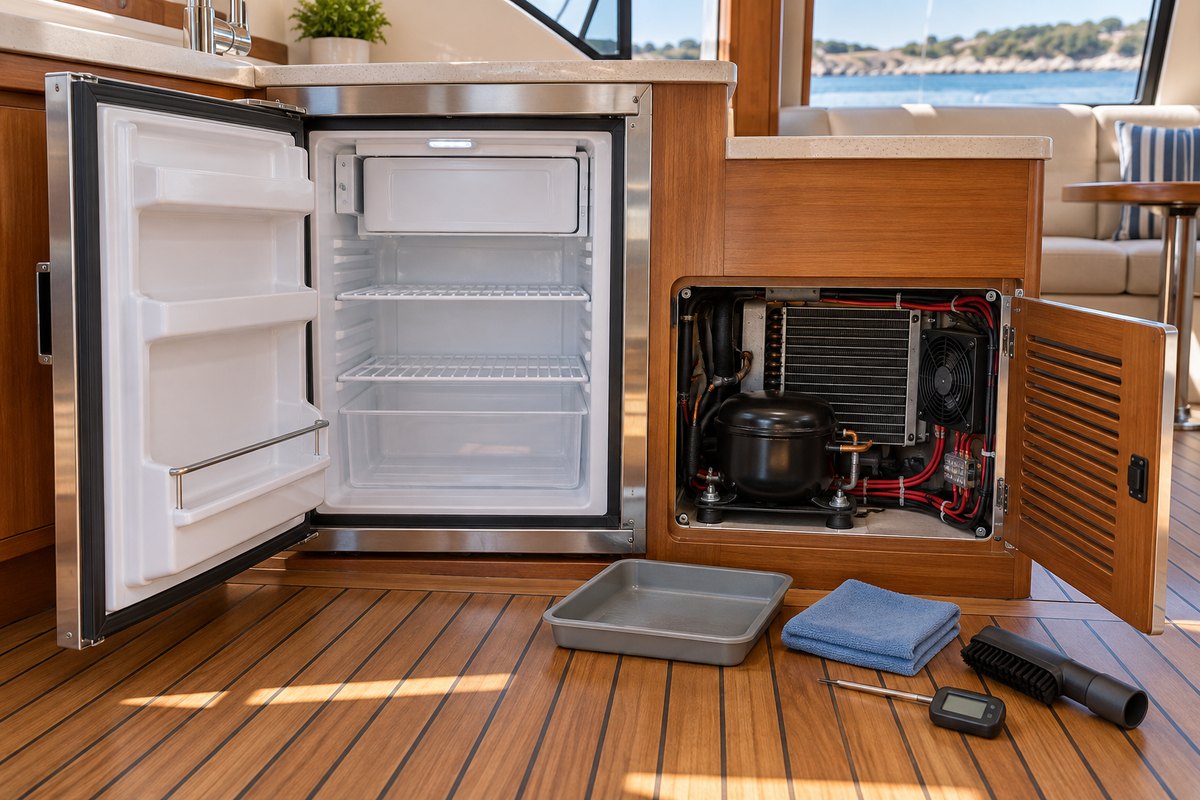
Identify the Refrigerator and Its Power Sources
Before shutdown, record the manufacturer, model, serial number, rated voltage, fuse or breaker, and any AC/DC power module. Note whether the freezer compartment is removable, whether the door latch has a ventilation position, and where the condenser and drain or collection tray are located.
Do not assume the thermostat knob removes all electrical power. Some controls switch cooling off while electronics remain energized. A dual-voltage refrigerator may have both DC and AC supplies. Use the boat’s wiring diagram and the appliance manual to identify every source before opening a service panel.
If the refrigerator has been running normally, record its interior temperature and listen to one complete compressor cycle before shutdown. A baseline helps separate an existing problem from a spring commissioning issue.
Empty the Cabinet Completely
Remove all food, beverages, ice trays, loose liners, and removable bins. Check door pockets, the back of shelves, and the freezer compartment for small packages that are easy to miss. Dispose of questionable food rather than storing it elsewhere aboard.
Inspect containers as they come out. A leaking jar or split can can leave sugar, salt, or acid in a seam where a quick wipe will not reach. Remove shelves and bins only as the manual permits, and photograph their positions if the arrangement is not obvious.
With the cabinet empty, turn the control off and disconnect the specified power sources. Label a removed fuse or switched-off breaker if someone else may work aboard. Do not leave loose conductors or bypass the manufacturer’s control to speed defrosting.
Defrost Without Heat or Sharp Tools
Dometic’s CRX instructions call for defrosting when ice forms and warn against hard or abrasive objects that can damage the refrigerator. Isotherm guidance similarly treats defrosting as a normal maintenance step. The safe method is patience.
Place absorbent towels or a shallow tray where meltwater will collect, then leave the door open. Allow frost and ice to melt at cabin temperature. Do not chip at the evaporator with a knife, screwdriver, scraper, or pick. Do not use a heat gun, hair dryer, portable heater, boiling water, or open flame. A punctured evaporator can release refrigerant and turn routine layup into a sealed-system repair.
As ice loosens, remove it only if it lifts away without force. Keep meltwater out of the thermostat, light, fan, electrical connectors, and cabinet seams. Empty the drip tray as needed.
If frost returns quickly during normal use, inspect the door seal, latch, temperature setting, food-loading habits, and ventilation rather than treating frequent heavy ice as inevitable.
Clean the Interior With Model-Approved Products
Once fully defrosted, wash the cabinet, shelves, bins, and door liner with the mild cleaner permitted by the manufacturer. Dometic warns against abrasive cleaning agents and hard objects. Avoid solvent cleaners, bleach concentrations, scouring powder, and products with strong perfume unless the appliance manual expressly permits them.
Use a soft cloth to reach:
- Shelf supports and rack corners
- The underside of the freezer compartment
- Drawer slides and the space below the crisper
- Door pockets
- The gasket folds and mating surface
- Drain openings and removable collection trays
Do not pour water into the cabinet. Apply cleaner to the cloth, control runoff, and keep electrical components dry. Wipe away all residue with a clean damp cloth, then dry every surface.
Persistent odor usually means residue remains in a seam, drain, tray, or gasket—not that the cabinet needs a stronger fragrance. Find and remove the source.
Inspect the Door Gasket, Latch, and Hinges
Clean the gasket gently and inspect it in good light. Look for tears, hardened corners, mold staining, distortion, or a section pulled out of its channel. Confirm that the cabinet’s mating flange is clean and smooth.
Close the door and observe whether the gasket contacts evenly. A door that drops, rubs, or needs unusual force may have a loose hinge, overloaded shelf, misaligned latch, or distorted gasket. Tighten hardware only to the manufacturer’s specification; small screws in thin cabinet material are easy to strip.
Test the latch in both its normal closed position and, if equipped, its storage-vent position. Isotherm manuals instruct owners to leave the door slightly open during extended shutdown to ventilate the cabinet and prevent mold. Some models provide a specific latch position for this purpose. Do not wedge the door with an object that strains the hinge or permanently compresses the gasket.
Clear the Condenser’s Air Path
A compressor refrigerator moves heat from the cabinet to the condenser. It cannot cool efficiently if the intake is blocked, the warm-air outlet is covered, or dust mats the condenser and fan.
With every power source isolated, remove only the service panel intended for owner access. Use a vacuum with a soft brush attachment to lift dust from the vent grille, fan guard, and accessible condenser surfaces. Isotherm guidance calls for cleaning dust from the condenser as part of seasonal maintenance.
Do not bend fins, push the brush into wiring, spin the fan at high speed with compressed air, or loosen refrigerant tubing. Copper lines may be deliberately formed and supported; moving them can create stress or vibration cracks.
Inspect the compartment for:
- Blocked intake and exhaust openings
- Dust, pet hair, and stored gear against the condenser
- Loose fan guard or mounting fasteners
- Chafed wiring or failed strain relief
- Corroded terminals
- Oil residue on sealed refrigerant tubing
- Water staining from a nearby plumbing leak
Oil residue, a damaged tube, or a compressor that will not start belongs to a refrigeration technician. The sealed system does not need routine owner “topping off,” and service fittings should not be opened during seasonal maintenance.
Inspect DC Wiring and Low-Voltage History
Marine compressor refrigerators can be sensitive to voltage drop. A unit may start at the dock but cycle off on battery power if the supply cable, fuse holder, breaker, connector, or ground path has excessive resistance.
With power isolated, inspect accessible wiring and terminals for discoloration, loose hardware, corrosion, heat, and chafe. Verify that circuit protection matches the boat and refrigerator documentation. Never install a larger fuse to stop nuisance opening.
If the refrigerator showed low-voltage faults during the season, record battery voltage and the voltage at the appliance while the compressor attempts to start, following the manufacturer’s diagnostic procedure. A resting voltage measurement at the battery does not reveal voltage drop under compressor load.
Do not condemn the compressor until power, ventilation, thermostat settings, and diagnostic codes have been checked. Many modern controllers provide LED or display fault indications; copy the exact pattern before disconnecting power.
Dry the Cabinet and Drainage Areas Completely
After cleaning, wipe the interior dry and allow it to air out. Check under bins, around the freezer compartment, inside gasket folds, and in the external collection tray. Isotherm guidance specifically calls for eliminating condensation inside the unit and in the external water tray before an extended shutdown.
If the refrigerator has a drain, verify its purpose and cleaning method in the manual. Do not force wire, compressed air, or chemicals into a small drain that may connect to a tray or fitting you cannot see. Confirm the tray is seated correctly before replacing a service panel.
Moisture control matters more than adding deodorizer. A dry, ventilated cabinet should not require bowls of chemicals that can spill, corrode metal, or contaminate food-contact surfaces.
Set the Refrigerator for Storage
When the refrigerator is clean and completely dry:
- Confirm cooling is off.
- Disconnect all power sources required by the manual.
- Reinstall clean shelves and bins only after they are dry.
- Empty and reinstall the condensate tray.
- Keep ventilation grilles clear.
- Set the latch to its designed ventilation position or leave the door slightly ajar as instructed.
- Make sure the door cannot swing in waves or during yard movement.
If the boat remains in service and the refrigerator must operate through winter, do not use the layup configuration. Maintain power, ventilation, temperature monitoring, and routine inspection appropriate to continuous use.
Spring Recommissioning
Before restoring power, remove any temporary door restraint and inspect the cabinet for moisture, mold, insects, or corrosion. Confirm the service panel is secure and nothing blocks the condenser intake or outlet.
Restore the correct power source, set the control to a moderate value, and allow the refrigerator to stabilize empty. Use a reliable thermometer rather than judging temperature by touch. Verify that the compressor cycles, the fan operates if fitted, the cabinet cools, and no fault indication appears.
Load food only after stable operation has been confirmed. If the compressor repeatedly attempts to start, the wiring becomes warm, the controller signals low voltage, or the cabinet does not cool, shut it down and troubleshoot with the model manual.
Marine Refrigerator Winter-Storage Checklist
- Record the model, serial number, voltage, and circuit protection.
- Note operating temperature and any fault code before shutdown.
- Remove all food, ice, shelves, bins, and loose liners.
- Turn the control off and isolate every power source.
- Defrost naturally with the door open.
- Never use a blade, pick, heat gun, or boiling water.
- Clean with only approved mild products and soft materials.
- Dry the cabinet, gasket folds, drain, and collection tray.
- Inspect the gasket, latch, hinges, and door alignment.
- Vacuum accessible condenser surfaces and ventilation grilles.
- Inspect accessible wiring, fan, mounts, and tubing without opening the sealed system.
- Keep intake and warm-air outlets clear.
- Leave the door ventilated in the manufacturer’s storage position.
- Reinspect and temperature-test before loading food in spring.
Record the Work in BoatDuty
Record the shutdown date, refrigerator manufacturer and model, power configuration, fuse or breaker value from the manual, temperature before shutdown, and any controller fault code. Note when defrosting was completed, which cleaning product was used, gasket and latch condition, condenser condition, and whether the drain or tray was cleared.
If parts were replaced, record the gasket, fan, latch, thermostat, fuse holder, or controller part number. In spring, add the recommissioning date, empty-cabinet temperature, voltage under compressor load if measured, and any repair required. That history makes gradual changes in cooling time, cycling, or power behavior easier to recognize.
When to Call a Marine Refrigeration Technician
Arrange professional service for oil residue on refrigerant tubing, a punctured or corroded evaporator, repeated controller faults, a compressor that stalls on a verified power supply, damaged sealed-system tubing, abnormal heat, or cooling failure after airflow and controls are confirmed. Refrigerant recovery and sealed-system work require appropriate equipment and training. Seasonal maintenance should never involve venting refrigerant or adding charge by guesswork.