

A marine engine heat exchanger transfers engine heat into seawater without mixing the engine’s closed-loop coolant with the raw-water circuit. When the exchanger is clean and sealed, coolant stays inside the engine while seawater carries heat overboard. When its tubes, end caps, gaskets, or sacrificial anode deteriorate, the symptoms can range from a small green stain to overheating, coolant loss, or internal cross-leakage.
Fall layup is a practical time for a marine engine heat exchanger inspection because deposits and leakage clues are still fresh from the season. It is also the right moment to correct restricted flow before winterizing fluid is expected to reach every raw-water passage. This is not a universal disassembly procedure. Heat exchangers differ by engine family, generator, transmission cooler, charge-air cooler, and installation. Use the current owner’s or service manual for the exact model, and assign pressure testing, chemical cleaning, tube repair, and internal leak diagnosis to a qualified marine engine or heat-exchanger technician.
Understand Which Cooler You Are Inspecting
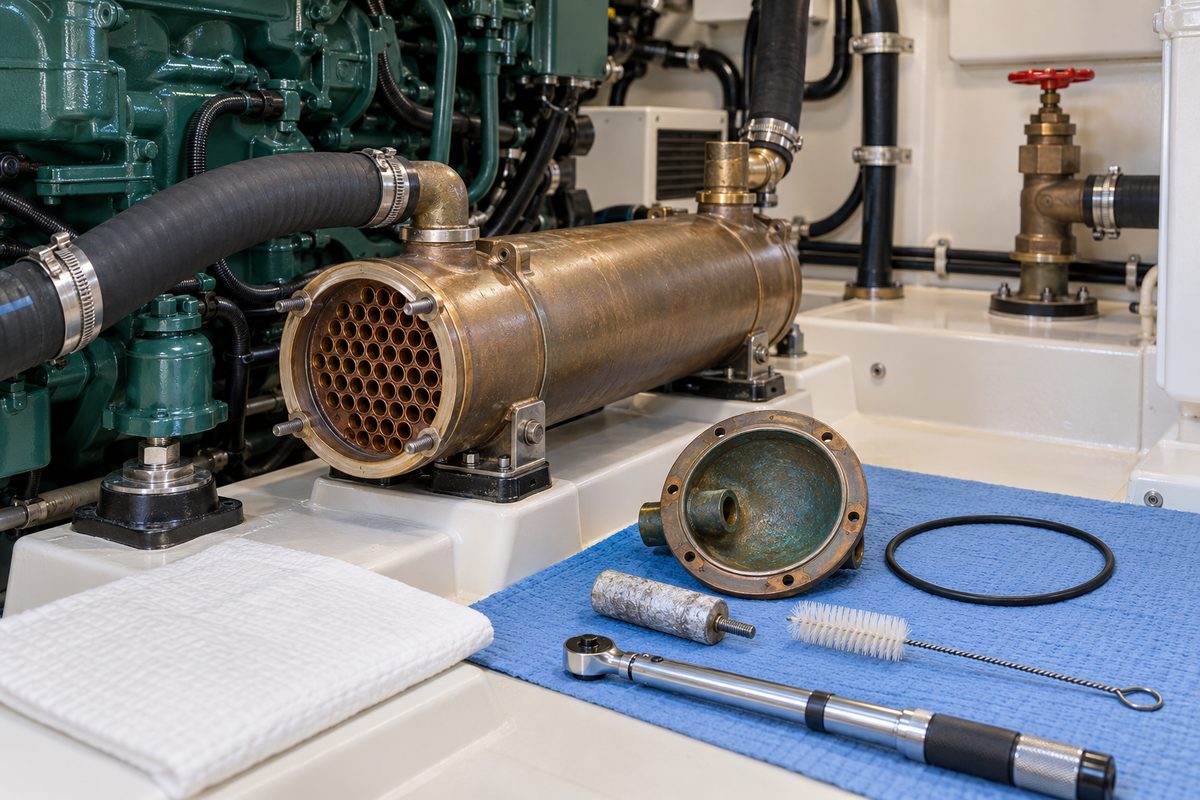
Many inboard diesels and some gasoline engines use a cylindrical shell-and-tube exchanger. Engine coolant circulates around a bundle of small tubes while raw water passes through the tubes—or the flow paths may be reversed in another design. Rubber or metal end caps route the raw water through one or more passes. Some units contain a threaded pencil zinc or other sacrificial anode; others use a different alloy, place anodes elsewhere, or specify none at all.
The engine may also have separate coolers for engine oil, marine-gear oil, power steering, fuel, or charge air. A compact cooler downstream of the main heat exchanger should not be serviced by assuming it shares the same gaskets, cleaning method, anode, or torque values.
Before work, record:
- engine make, model, serial number, and hours;
- heat-exchanger or cooler part number if visible;
- coolant specification and last replacement date;
- end-cap gasket or O-ring part numbers;
- anode material and part number, if fitted;
- the manual’s inspection, cleaning, and pressure-test intervals; and
- any summer symptoms such as rising temperature, reduced exhaust-water flow, coolant loss, salt deposits, or recurring anode consumption.
Westerbeke manuals, for example, instruct owners of applicable models to open heat-exchanger end caps, remove debris, renew damaged sealing parts, and inspect the pencil zinc. That guidance is useful for those engines, but its monthly anode check or sealant instructions should not be copied automatically to another brand.
Make the Engine Safe Before Opening the Cooling System
Let the engine become completely cold. Hot coolant can remain pressurized and can cause severe burns when a cap, hose, or drain is opened. Disable automatic generator start if the exchanger is on a genset. Turn off the engine’s battery switch or isolate starting power by the boatbuilder’s procedure, and tag the controls so no one starts the engine.
Close the raw-water intake seacock before disconnecting any hose below the waterline. Verify that the valve is actually closed and accessible. If the boat is afloat, keep a suitable soft plug nearby and never leave an open hose unattended. Protect the bilge from coolant and cleaning residue; ethylene-glycol coolant is toxic and must not be discharged overboard or into the bilge.
Only remove the pressure cap, coolant hose, drain, end cover, or anode after the relevant circuit is cool and depressurized. If the exchanger sits above other machinery, place absorbent material and a controlled catch pan beneath it. Photograph hose routing, cap orientation, drain locations, and the position of any bonding wire before taking parts apart.
Start With an External Heat Exchanger Inspection
Good light and a dry surface reveal more than a wet, grimy engine. Clean the exchanger exterior with the method allowed by the engine maker, then inspect the entire shell, brackets, end caps, hose connections, and nearby components.
Look for:
- dried coolant crust or colored streaks around the shell and coolant connections;
- white salt crystals, green copper salts, or rust-colored stains around raw-water joints;
- dampness at end caps, gaskets, drains, plugs, and anode bosses;
- cracked, swollen, soft, oil-soaked, or chafed hoses;
- loose or badly corroded clamps;
- fretting marks, broken mounts, or vibration contact with another component;
- dents, abrasion, paint blistering, or shell corrosion;
- staining directly below a weep that may evaporate on a warm engine; and
- zinc fragments, scale, or rubber debris collected in a downstream hose.
Do not dismiss a stain simply because the joint is dry during layup. Mark its edge, take a photo, and investigate. Tightening a clamp may cure a loose hose connection, but repeated seepage at a cap or shell seam can indicate a distorted cover, damaged sealing surface, failing gasket, or corrosion.
Use Operating History to Find Restriction Clues
Cooling trouble often appears under load before it appears at idle. Review temperature readings from the season rather than relying only on the last dockside run. Note whether temperature climbed gradually at cruising power, changed after a raw-water-pump service, or returned to normal when rpm fell. A fouled hull intake, blocked strainer, worn impeller, collapsed hose, restricted exhaust elbow, faulty thermostat, low coolant, slipping belt, or inaccurate sender can resemble an exchanger restriction.
Inspect the removed raw-water-pump impeller when the engine’s service schedule calls for it. If vanes are missing, follow the raw-water path and retrieve them from the first likely restriction points specified by the manual. An end cap or tube entrance can trap fragments. Do not merely install a new impeller and leave old rubber pieces to migrate.
Exhaust-water flow is a useful observation but not a calibrated test. Compare it only under similar engine speed and installation conditions. A professional can measure temperature differential, coolant pressure, raw-water flow, and exhaust backpressure when diagnosis is uncertain.
Inspect the Sacrificial Anode Only If the Exchanger Has One
A pencil anode in the raw-water side protects compatible exchanger metals by corroding preferentially. It is a consumable service item, not a permanent plug. Some engines use zinc, aluminum, or another specified alloy; some freshwater applications use a different material; and some heat exchangers do not use an internal anode. Install only the part and alloy approved for the engine.
With the circuit safe and the seacock closed, use two wrenches where the manual directs: one to support the stationary boss and one to loosen the anode fitting. This prevents excessive torque from damaging the exchanger shell or brazed connection. Examine the removed element for:
- heavy consumption or a remaining core with little active material;
- uneven attack, cracking, or a loose element;
- a hard scale that may isolate the surface;
- almost no consumption over a long interval, which may indicate the wrong alloy, poor electrical contact, or no exposure to water; and
- missing pieces that may now be inside the exchanger.
Westerbeke cautions that sealant on certain pipe-thread anodes can electrically insulate the zinc and defeat its purpose. Other engines may specify a sealant, washer, or torque procedure. Follow the exact manual rather than treating either approach as universal.
If the anode has shed material, inspect the adjacent chamber and end-cap area for fragments. Record its condition and service hours. A photograph beside a ruler creates a useful comparison for the next inspection. Rapid consumption deserves investigation of water chemistry, bonding condition, electrical faults, incompatible metals, and the correct anode specification—not simply a shorter replacement interval.
Open End Caps Without Damaging the Tube Stack
Remove end caps only if the engine manual treats this as owner service and you have the correct replacement gaskets or O-rings available. On some exchangers, coolant must be drained first; on others, the cap opens only the raw-water side. Never assume.
Loosen fasteners evenly and support the cap as it comes free. Note the orientation of divider plates, arrows, hose necks, and any different-length bolts. Do not drive a screwdriver between machined sealing faces. A stuck cap may require the manufacturer’s puller or a technician rather than prying.
Inspect:
- the cap for cracks, dezincification, corrosion, erosion, and distorted bolt holes;
- sealing faces for pitting or old gasket residue;
- O-rings for flattening, cuts, swelling, hardening, or loss of elasticity;
- rubber end caps for splits, softness, and clamp impressions;
- divider webs for erosion that could let water bypass the intended tube pass; and
- the visible tube sheet for loosened tubes, pitting, cracks, or salt tracks.
Use new seals when the manual requires them. A reusable-looking gasket can leak after it has been compressed, disturbed, or dried. Keep spare end-cap seals aboard if the manufacturer recommends them.
Check Tube Entrances and the Bundle for Deposits
Illuminate the tube entrances without pushing debris deeper. Common obstructions include impeller fragments, shell pieces, eelgrass, sand, silt, zinc flakes, salt scale, and biological growth. Record where debris is concentrated; its location can point to a failing upstream component or an intake problem.
Never ram a drill bit, steel rod, coat hanger, or screwdriver through soft exchanger tubes. A tool can score a tube, enlarge it, puncture it, or detach it from the tube sheet. If the manual allows mechanical cleaning, use the specified diameter and material—often a soft brush or purpose-made rod—with the bundle supported correctly.
Chemical descaling is equally model-specific. Acids and alkaline cleaners that are acceptable for one alloy can attack another, damage solder or brazing, harm elastomers, or create hazardous fumes. Do not mix cleaners, and never mix acid with bleach or chlorinated products. A professional heat-exchanger shop can remove the unit, clean it with controlled chemistry, neutralize and rinse it, and pressure-test each circuit.
If the tube bundle is removable, do not pull it unless the service manual provides the sequence. Tube stacks can be damaged by uneven force, and their seals, orientation, and insertion depth matter. Photograph any bundle removed by a technician and record whether it was cleaned, repaired, or replaced.
Know When Pressure Testing Is Necessary
External cleaning cannot prove that two internal circuits are isolated. Arrange professional pressure testing when there is unexplained coolant loss, raw-water contamination in coolant, coolant in the exhaust stream, recurring cap leakage, visible tube damage, freezing history, severe corrosion, or an overheat that may have stressed the exchanger.
Each circuit must be tested at the pressure and with the medium specified for the unit. Excessive shop air can turn a plug or cap into a projectile and can damage a serviceable exchanger. A technician can isolate the coolant and raw-water sides, test them separately, and locate a leaking tube, tube sheet, shell, or end cover.
A failed tube should be repaired only by an approved method. Plugging a tube reduces heat-transfer area and may be permitted only within the manufacturer’s limit. Replacing a bundle or complete exchanger may be safer than accumulating multiple repairs.
Reassemble With the Correct Parts and Torque
Clean sealing faces without gouging them. Install the specified O-rings, gaskets, end caps, anode, plugs, and clamps. Use lubricant or sealant only where the manual calls for it and only the approved type. Keep sealant out of raw-water passages and off electrical contact surfaces for sacrificial anodes.
Tighten end-cap fasteners evenly in the published sequence and torque range. Over-tightening can bow a cover, split a rubber cap, extrude an O-ring, strip threads, or distort a tube sheet. Under-tightening can leak when the engine warms and pressure rises.
Restore any drained coolant using the engine maker’s approved coolant, mixture, filling point, and air-bleeding procedure. Do not mix coolant chemistries based on color alone. If the old coolant is contaminated, rusty, oily, or overdue, treat that as a separate closed-cooling-system service and investigate the cause.
Protect the Exchanger During Winter Layup
Complete heat-exchanger inspection before final raw-water winterization. Debris or a blocked tube can prevent antifreeze from reaching part of the circuit. The engine manual determines whether the raw-water side is drained, displaced with approved potable propylene-glycol antifreeze, or protected by another method.
Do not assume seeing colored fluid at the exhaust proves every cooler and low point is protected. Thermostats, bypasses, siphon breaks, mufflers, coolers, drains, and hose routing affect flow. Some procedures require opening specific drains or feeding antifreeze through a defined hose. Never use automotive ethylene-glycol coolant in the raw-water discharge path.
Leave seacocks, drains, plugs, and caps in the documented storage positions. If an end cap or drain remains open for storage, tag it prominently at the helm and engine. Protect openings from insects and debris without creating a forgotten launch hazard.
Recommission and Leak-Test Under Real Conditions
Before launch or restart:
- Confirm every end cap, drain, anode, plug, hose, and clamp is installed.
- Restore the raw-water intake seacock to the correct position.
- Recheck coolant level only with the engine cold.
- Remove lockout tags and restore starting power.
- Supply cooling water by the engine maker’s approved method.
- Start at idle and verify prompt exhaust-water flow.
- Inspect every serviced joint for seepage.
- Bring the engine to operating temperature while monitoring the gauge and coolant level.
- Recheck for leaks after shutdown and full cool-down.
- Perform a controlled sea trial under normal load and compare temperature with the recorded baseline.
Never run a raw-water pump dry. A no-flow condition, rising temperature, coolant loss, steam, or active leak requires immediate shutdown and diagnosis.
Marine Engine Heat Exchanger Inspection Checklist
- Identify the exact engine, exchanger, cooler, and current manual.
- Record hours, coolant type, prior service, and seasonal temperature symptoms.
- Cool the engine, isolate starting power, close the seacock, and contain fluids.
- Clean and inspect the shell, mounts, hoses, clamps, drains, and joints.
- Investigate coolant stains, salt crystals, corrosion, vibration, and chafe.
- Inspect the specified sacrificial anode, if fitted, and recover loose fragments.
- Open end caps only with the approved procedure and replacement seals ready.
- Inspect caps, gaskets, divider webs, tube sheets, and tube entrances.
- Remove debris with only the manual-approved tools and cleaning method.
- Arrange professional cleaning or pressure testing when leakage or restriction is suspected.
- Reassemble with the correct parts, sealants, sequence, and torque.
- Fill and bleed the closed-coolant circuit by the engine procedure.
- Winterize the complete raw-water path after confirming it is clear.
- Recommission at idle, at operating temperature, and under normal load.
Record Heat Exchanger Service in BoatDuty
Create a BoatDuty maintenance entry with the inspection date, engine hours, engine and exchanger model, coolant specification, anode part number and condition, end-cap seal part numbers, debris found, cleaning method, technician or shop, pressure-test results, torque values used, coolant quantity added, winterization method, and every leak or repair. Attach notes about missing impeller pieces or unusually rapid anode loss so the next inspection begins with evidence rather than memory.
A heat exchanger rarely fails without leaving clues. Recording those clues—and the exact parts and procedures used—makes the next cooling-system decision faster and more defensible.
Sources
- Westerbeke, 5.0/6.5 MCG Operators Manual (heat-exchanger service, end-cap cleaning, zinc-anode inspection, and pressure testing)
- Westerbeke, 7.5 MCGA Operators Manual (current maintenance checklist for heat-exchanger end caps, gaskets, O-rings, and zinc anode)
- Yanmar Marine, JH-CR Series Operation Manual (model-specific cooling-system layout, inspection, and maintenance)
- Yanmar Marine, 4LVZ Series Operation Manual, October 2025 (current model-specific cooler and seawater-system information)
- Volvo Penta, Support and Manuals for Marine Products (locate the current operator and service manual by product)
- Volvo Penta, Marine Maintenance Parts and Anodes (use model-matched maintenance parts and anode protection)