

A marine diesel air heater can turn a cold cabin into usable space without running the propulsion engine, but safe heat depends on more than whether the control panel lights up. Before regular cold-weather use, inspect the heater's mounting, air ducts, fuel supply, combustion-air intake, exhaust, wiring, and shutdown behavior. Small problems in any one of those paths can cause poor heat, repeated lockouts, smoke, unusual odor, or an unsafe installation.
This guide applies to compact fuel-fired forced-air heaters installed on recreational boats. It does not cover hydronic coolant heaters, reverse-cycle air conditioning, portable unvented heaters, or improvised automotive installations. Marine heater layouts and service procedures vary by model, fuel, output, and control system, so use the exact operating and installation manuals for your unit.
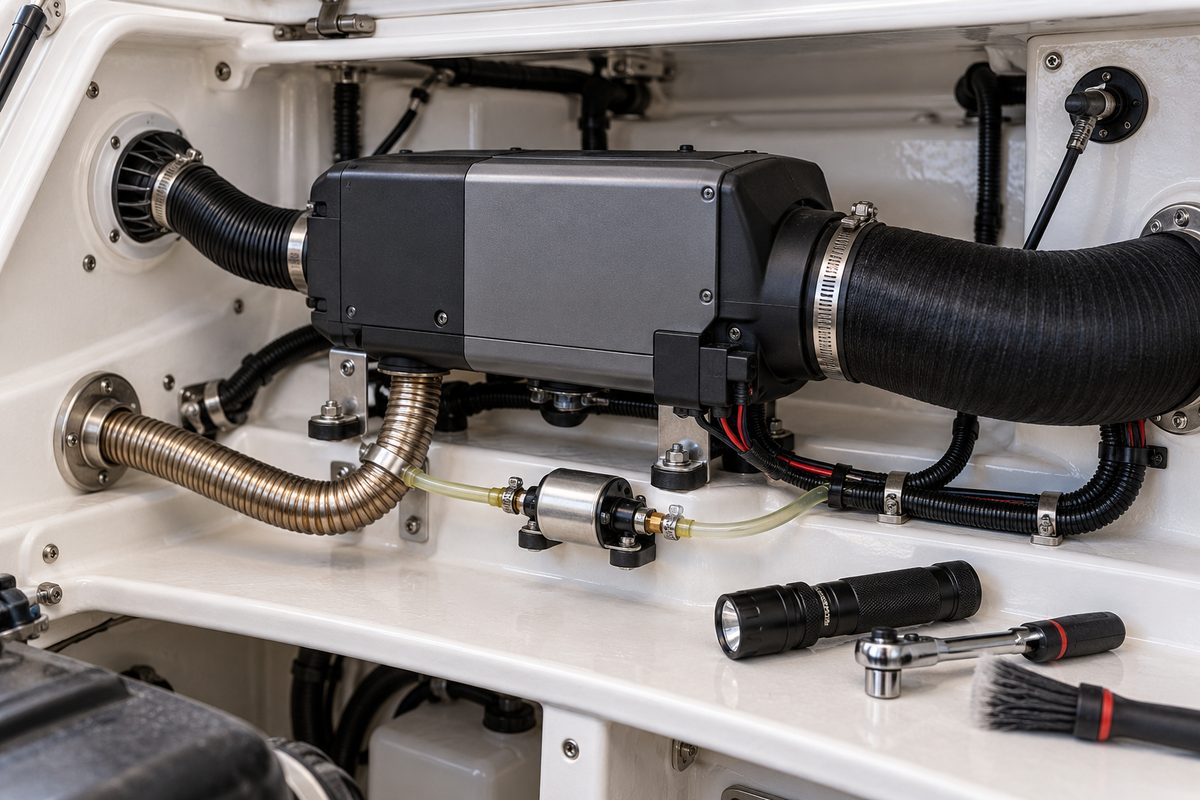
Start With the Heater's Identity and Service History
Find the model and serial information without removing covers that the owner is not expected to open. Record the rated voltage, fuel type, controller, and any diagnostic code displayed during the last operating cycle. Confirm that the heater and its installation kit are approved for the boat and fuel in use.
Review prior service records for:
- repeated failed starts or lockouts;
- smoke during startup or shutdown;
- combustion odor in the cabin;
- declining heat output or airflow;
- unusual ticking, scraping, or fan noise;
- fuel-system work elsewhere on the boat;
- low-voltage events; and
- earlier exhaust, duct, or wiring repairs.
Patterns matter. A heater that has been reset repeatedly may need diagnosis rather than another reset. Do not erase fault history or keep cycling power to force a start without following the manufacturer's troubleshooting procedure.
Make the Space Safe Before Inspection
Turn the heater off with its normal control and allow the full cool-down or after-run cycle to finish. Cutting battery power while the heater is hot can interrupt the controlled run-on that carries heat away from internal components. Once the heater is cool, isolate its electrical supply according to the manual before touching wiring or connections.
Ventilate the area and keep ignition sources away from fuel components. If you find liquid fuel, a strong persistent fuel odor, scorched material, melted wiring, a loose exhaust joint, or evidence that exhaust has entered the boat, do not operate the heater. Have a qualified marine-heater technician correct the fault.
Inspect the Heater Body, Mount, and Clearances
The heater should be firmly attached to a rigid surface using the approved bracket and hardware. Check for loose fasteners, cracked mounts, corrosion, water tracks, abrasion, or a heater body that has shifted. Look for stored gear, insulation, cleaning cloths, or other material that has migrated into the service space or against an air opening.
Confirm that required clearances around the heater, ducts, exhaust, fuel components, and wiring still match the installation manual. A locker may have been repacked since the heater was installed, changing a previously safe layout.
Do not pressure-wash the heater. Webasto's operating guidance for Air Top models specifically warns against high-pressure cleaning. Use only the cleaning methods permitted by your manufacturer, and keep water out of connectors, control modules, motors, and air passages.
Check the Heated-Air and Return-Air Paths
Fuel and exhaust receive much of the safety attention, but restricted cabin-airflow can also reduce performance and overheat components. Trace the heated-air duct from the heater to every outlet that applies. Check for crushing, sharp bends, loose clamps, detached branches, collapsed liner, or stored items covering a grille.
Inspect the return-air or cold-air inlet. Some systems recirculate cabin air; others use a particular intake arrangement defined by the installation kit. Clean an approved intake filter if the model has one, using the manual's instructions. Do not add a generic filter to a system that was not designed for it, because added restriction can alter airflow.
At each cabin outlet, verify that louvers move and that no bedding, cushion, or gear blocks the discharge. Ducts and outlet fittings can become hot in operation, so maintain the clearances specified for the installation.
Inspect Combustion-Air Intake and Exhaust Separately
The heated cabin air and the combustion process are different paths. The combustion-air inlet supplies the burner; the exhaust carries combustion products outside. They must remain unobstructed and arranged so exhaust cannot be drawn back into the intake or accommodation spaces.
With the heater cold, inspect the combustion-air inlet, silencer if fitted, hose, supports, and termination. Remove only loose external debris that the manual says an owner may clear. Do not poke tools into the heater or change hose length, diameter, or routing without installation guidance.
Then inspect the exhaust from the heater connection to the outlet. Look for:
- loose clamps or fittings;
- cracked, crushed, kinked, or heavily corroded tubing;
- soot staining at a joint;
- failed insulation or heat shielding;
- contact with wiring, hoses, fiberglass, or stored gear;
- a blocked outlet or insect nest;
- water tracks or corrosion at the through-hull; and
- a low spot or drain arrangement that no longer matches the approved layout.
Webasto operating instructions warn that a blocked exhaust or combustion-air system can put the heater into an unsafe condition. Treat soot, exhaust odor, or a damaged exhaust component as a stop-use issue, not a cosmetic defect.
Inspect the Fuel Supply Without Opening the Burner
Trace the heater's fuel path from the approved pickup or tank connection through its filter, metering pump, small-bore line, supports, and heater connection. The exact parts and allowable routing are model-specific.
Look for wetness, staining, cracks, hardened hose, chafe, loose supports, corroded pump terminals, and fittings that have been disturbed. The metering pump is normally mounted in a specified orientation and location; compare yours with the installation manual rather than changing its angle based on appearance.
Do not substitute general-purpose tubing, clamps, filters, or connectors. Manufacturer-approved line and hardware are part of the metered fuel system. If the fuel line contains unexplained bubbles, repeatedly loses prime, or shows leakage, stop and arrange service.
Where a model's operating instructions address seasonal diesel, follow them exactly. Webasto's current Air Top Evo 40/55 instructions state that after filling with winter-grade diesel, operating the heater for about 15 minutes moves that fuel through the heater supply. That instruction is model-specific; do not apply the time blindly to gasoline heaters, paraffinic fuels, or another manufacturer's equipment.
Inspect Wiring, Voltage Supply, and Controls
Check the heater's protected supply conductors, fuse or breaker, ground return, harness connectors, controller cable, and fuel-pump wiring. Look for loose terminals, green corrosion, overheated insulation, pinched harnesses, unsupported cable, or splices exposed to moisture.
Low voltage during startup can prevent reliable ignition even when the battery appears adequate at rest. If the heater reports an undervoltage fault or behaves differently when other loads operate, measure voltage at the heater during the startup cycle using the manufacturer's procedure. Correct cable, connection, fuse-holder, battery, or charging faults rather than installing a larger fuse.
Inspect the controller for damage and confirm that its temperature sensor, if separate, has not been covered, moved next to a heat source, or trapped behind upholstery. A misplaced sensor can make a healthy heater cycle poorly.
Perform a Controlled Operational Test
Restore power only after the visual inspection is complete and all access covers and guards are in their normal operating positions. Ensure the combustion-air and exhaust terminals are clear, then start the heater from its normal control.
Observe the complete cycle:
- The control accepts the heat request without an immediate fault.
- The fan starts and sounds smooth rather than scraping or surging.
- The metering pump begins its expected pulsing sequence.
- Ignition occurs without persistent white or black smoke.
- Heated air reaches the outlets with no disconnected duct or hot spot.
- The controller regulates rather than repeatedly stopping on a fault.
- No fuel or exhaust odor enters the cabin.
- After a normal switch-off, the heater completes its controlled cool-down.
Some odor at an exterior exhaust outlet is normal for combustion equipment, but odor inside the boat is not something to dismiss. If heavy smoke, unusual combustion noise, a combustion smell in the cabin, or repeated automatic shutdown occurs, switch the heater off normally if it is safe to do so, ventilate the boat, and seek qualified service.
Never disconnect the battery or use an emergency power cutoff as the routine way to stop the heater. The normal control is intended to initiate the after-run cycle. Use emergency isolation only when an immediate hazard requires it.
Know Which Work Belongs to a Technician
Owner inspection can find loose mounts, obstructed grilles, chafed wiring, damaged ducts, fuel seepage, and exhaust problems. Burner disassembly, combustion-chamber cleaning, glow-pin or igniter work, fuel-pressure or delivery diagnosis, control-unit repair, and exhaust-system replacement require model knowledge and often specialized tools.
Arrange professional service when you find:
- any fuel leak or persistent fuel odor;
- soot at a joint or exhaust odor inside the boat;
- a cracked or corroded exhaust component;
- repeated lockouts or diagnostic codes;
- heavy smoke that does not clear normally;
- scraping, grinding, or abnormal fan noise;
- heat-damaged wiring or nearby material;
- unreliable startup with verified supply voltage; or
- a service interval or inspection requirement stated in the manual.
Do not use generic Internet reset sequences to bypass a lockout. The fault code and model documentation should guide the diagnosis.
Marine Diesel Air Heater Maintenance Checklist
- Record heater model, serial information, voltage, fuel type, and controller.
- Review fault history and earlier service notes.
- Shut down with the normal control and allow the full after-run cycle.
- Inspect the heater body, bracket, hardware, clearances, and surrounding locker.
- Check warm-air ducts, outlets, return-air path, and approved intake filter.
- Inspect combustion-air intake and exhaust as separate systems.
- Look for exhaust blockage, soot, corrosion, failed insulation, and loose joints.
- Inspect the approved fuel line, filter, metering pump, supports, and fittings.
- Check wiring, circuit protection, grounds, connectors, and controller cable.
- Verify supply voltage during startup if the manual or fault history indicates it.
- Run a complete startup, heat, regulation, shutdown, and cool-down test.
- Stop using the heater and arrange service for fuel leaks, cabin exhaust odor, heavy smoke, abnormal noise, or repeated faults.
Record the Work in BoatDuty
Use BoatDuty to record the inspection date, heater hours if available, model, fuel type, fault codes, voltage readings, filter or parts used, and the result of the full operational test. Note any duct, fuel-line, exhaust, wiring, or controller repair and the technician who completed model-specific service. A clear record helps distinguish a one-time low-voltage start from a recurring combustion or fuel-delivery problem.
A marine diesel air heater should start cleanly, move air freely, keep combustion products outside, and shut down through its designed cool-down cycle. A careful fall inspection makes those four conditions visible before cold weather turns the heater into essential equipment.
Sources
- Webasto, Air Top Evo 40/55 operating instructions
- Webasto, Air Top 2000 STC Marine product information
- Webasto, marine heating solutions and system overview
- Webasto, maintenance and safety guidance for fuel-fired heaters
- Webasto, authorized-service maintenance guidance
- Eberspächer, marine heater application overview