

A careful bow thruster maintenance inspection after haulout can prevent weak thrust, vibration, blown fuses, overheated cables, and avoidable corrosion next season. Haulout gives you direct access to the tunnel, propeller, gear leg, and anode, while winter layup provides time to investigate electrical problems rather than discovering them during a windy docking maneuver.
Not every thruster uses the same propeller, anode, seal, lubrication, control system, or service interval. Fixed tunnel thrusters, retractable units, externally mounted pods, brushed DC motors, brushless motors, and hydraulic systems can require very different work. Identify the manufacturer, exact model, voltage, serial number, tunnel diameter, and propeller arrangement before removing parts or ordering replacements. The unit's current manual—not a generic torque value or an assumed maintenance schedule—should control the work.
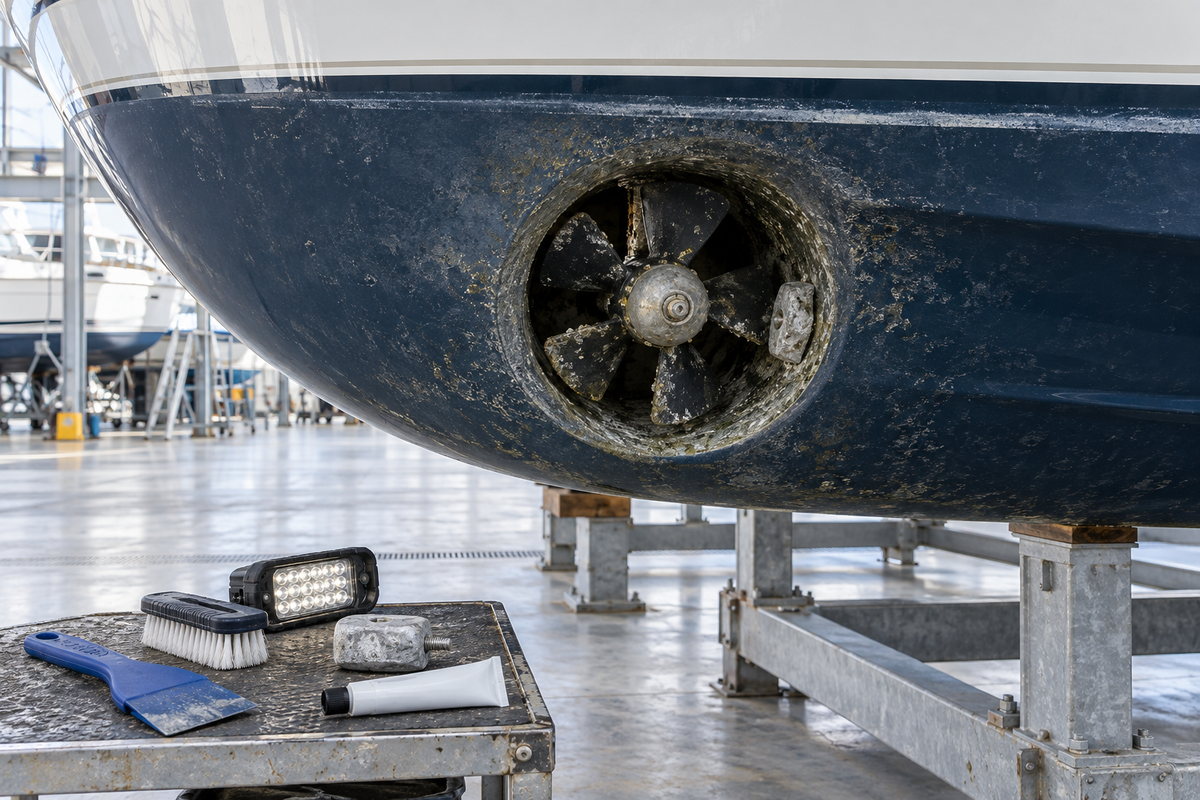
Make the Bow Thruster Safe Before Inspection
A thruster can start unexpectedly if a control circuit is activated, and its main cables may carry extremely high current. Treat the propeller and electrical system as hazardous until both are secured.
Before reaching into the tunnel or opening the motor compartment:
- Switch the thruster off at its dedicated main disconnect.
- Disable remote panels, wireless remotes, joystick integrations, and automatic position-hold functions.
- Isolate the thruster battery or approved battery-bank feed according to the boatbuilder and thruster manuals.
- Disconnect shore power and disable chargers, alternators, solar controllers, DC-to-DC chargers, or other sources that could re-energize the bank.
- Verify absence of voltage at the thruster feed with an appropriate meter before touching conductors.
- Tag the controls so no one restores power while the propeller is being inspected.
Do not depend on a helm-panel light as proof that the high-current circuit is dead. Some installations have separate control and motor supplies. If the wiring cannot be positively identified, stop and have a qualified marine electrician isolate it.
Clean the Tunnel Without Damaging the Equipment
Pressure-wash the hull and tunnel using the yard's approved method, but avoid directing an aggressive jet into shaft seals, gear-leg joints, retracting mechanisms, or cable entries. Remove remaining growth with a plastic scraper or nylon brush. Metal tools can gouge composite propellers, damage coatings, or score the tunnel.
Inspect the entire tunnel surface for:
- Heavy fouling or shell growth that could restrict water flow
- Loose antifouling paint, bare laminate, or failed fairing around the tunnel opening
- Cracks radiating from the tunnel-to-hull joint
- Exposed fibers, impact marks, voids, or moisture weeping
- A sharp edge or excess paint buildup that could disturb flow
- Debris that can jam the propeller
The tunnel is part of the hull structure. Cracking, movement, persistent weeping, or suspected delamination around its bond should be evaluated by the boatbuilder, a marine surveyor, or a qualified composite-repair professional before cosmetic refinishing.
Inspect the Bow Thruster Propeller
Clean propeller blades make visual damage easier to recognize. Rotate the propeller only when the power is positively isolated and the model's manual permits manual rotation.
Look for:
- Chipped, cracked, bent, swollen, or missing blades
- Fishing line, weed, plastic, or cord around the shaft or hub
- Polished areas showing contact with the tunnel wall
- Uneven blade-to-tunnel clearance
- Excessive axial or radial movement at the hub
- A loose propeller fastener, damaged locking device, or missing cover
- Abrasion or distortion consistent with a hard object entering the tunnel
Do not file blades into a new shape or mix unmatched replacement parts. Propeller profile, blade count, rotation, hub components, keys, washers, and fasteners are model-specific. A small apparent defect can upset balance and produce vibration under load.
If the propeller must be removed to access an anode or shaft seal, photograph the assembly first and follow the exploded diagram in the correct manual. Record the order and orientation of the key, washer, locking tab, nut, cover, and anode. Use only the specified lubricant, thread-locking product, fasteners, and torque. VETUS, for example, publishes different disassembly details and torque values for different tunnel diameters; those values must not be transferred to another model.
Check the Gear Leg, Shaft, and Seal Area
The submerged gear leg or tail piece transfers motor power to the propeller. Its external condition can reveal leaks, corrosion, impact damage, or misalignment.
Inspect for:
- Oil residue, milky seepage, or staining at joints and plugs
- Corrosion pits, cracked castings, or damaged protective coatings
- A bent or visibly off-center shaft
- Damaged V-rings, line cutters, seals, or propeller-shaft surfaces where fitted
- Contact between the propeller and gear leg
- Loose fasteners or disturbed locking compound
Do not assume every gear leg needs an oil change. Some are filled for long-term or lifetime lubrication; others have a specified oil type and service procedure. The VETUS maintenance manual states that certain tail pieces have long-term lubrication and do not require an oil change, while other product manuals describe their own oil-bath specifications. Follow the exact manual for the installed unit.
A seal or gear-case leak is not solved by adding lubricant. Determine why fluid escaped and whether water entered. Pressure or vacuum testing, seal replacement, shaft measurement, and gear inspection may require an authorized service center.
Inspect and Replace the Correct Anode
Many bow thrusters use a small sacrificial anode on the gear leg, propeller hub, or nearby hardware. Some newer designs do not use one, so verify the model before assuming a part is missing.
Clean the anode enough to judge its remaining shape without polishing it into a misleading appearance. Replace it at the threshold and interval in the manufacturer manual. VETUS recommends at least annual inspection for the models covered by its maintenance manual and replacement when the zinc anode is less than half its original size. That is a manufacturer-specific reference, not a universal rule.
When replacing an anode:
- Confirm the correct part number and alloy for the model and water environment
- Clean the mounting surface so the anode makes the required electrical contact
- Use the specified fastener, locking method, and torque
- Do not paint the anode or insulate its contact surface
- Investigate unusually rapid or uneven consumption
Fast anode loss can be influenced by water chemistry, temperature, stray current, or an electrical fault. An anode that remains pristine while nearby metal corrodes may lack electrical contact or may be the wrong material. Record its condition with a photograph and scale so the next haulout provides a meaningful comparison.
Use Antifouling Only Where the Manufacturer Permits
Marine growth inside a thruster tunnel reduces efficiency, but an incompatible coating can harm plastics, seals, metals, or transducer-like components. Never coat the motor, electrical parts, sacrificial anode, propeller-shaft seal, or specified contact surfaces.
Before painting:
- Read the thruster manufacturer's coating restrictions.
- Confirm the antifouling product is compatible with the propeller and gear-leg materials.
- Mask anodes, shaft surfaces, seals, identification plates, and moving joints.
- Maintain the required propeller-to-tunnel clearance.
- Avoid excessive film buildup at blade tips and tunnel edges.
If the propeller manufacturer allows antifouling, prepare and apply it exactly as directed. “More paint” is not better; excess buildup can change clearance and balance.
Inspect the Inboard Motor and Mounting
The electric motor, hydraulic drive, or retracting machinery is usually accessed inside the bow. The compartment should be dry, ventilated as specified, and clear of loose gear.
Check:
- Motor and gear-leg mounting fasteners
- Flexible couplings and intermediate flanges where visible
- Water tracks, condensation, salt deposits, or corrosion
- Motor ventilation openings and cooling-air clearance
- Oil leaks from hydraulic hoses or fittings on hydraulic units
- Retract limit switches, doors, hinges, and seals on retractable models
- Signs of overheated insulation, brush dust, arcing, or burnt odor
Brushed motors may have a carbon-brush inspection interval. VETUS manuals for some conventional DC thrusters call for periodic brush and commutator checks, while brushless and proportional models use different service requirements. Do not open a motor or controller unless the manufacturer authorizes owner service. Internal capacitors and high-current components can remain hazardous.
Check the High-Current Electrical Path
Poor connections create voltage drop and heat, both of which reduce available thrust. Inspect the complete path from the battery bank to the main fuse, disconnect, solenoid or controller, motor, and return cable.
With all power isolated, look for:
- Loose, discolored, cracked, or corroded cable lugs
- Heat-shrink that has softened or pulled away
- A main fuse with heat damage or an incorrect rating
- Unsupported cables that strain motor or solenoid terminals
- Chafe at bulkheads and sharp bends
- Corrosion under boots or terminal covers
- Loose control connectors, damaged harnesses, or pin corrosion
Use the manufacturer's torque values and the specified “two-wrench” method when a stud or internal terminal must not rotate. Do not tighten high-current terminals by feel, stack extra lugs without approval, or substitute a larger fuse to stop nuisance failures.
VETUS recommends recurring checks of battery-to-thruster and motor-solenoid connections in manuals for applicable models. The exact interval varies by product, installation, and service conditions, so place the model-specific interval in the boat's maintenance schedule.
Test Performance After Recommissioning
Complete the dry inspection before launch, then perform the operational test in the water. Never run a tunnel thruster dry unless the manufacturer expressly provides a dry-test procedure.
Restore batteries and charging sources in the specified sequence. Confirm that the tunnel is clear and no one is near the openings. Test each direction with short commands while observing the manual's maximum run time and cool-down limits. Listen for new vibration, grinding, clicking, or delayed engagement.
Where the manual provides specifications, record:
- Resting battery voltage
- Voltage at the motor or controller during operation
- Current draw
- Thrust response in both directions
- Controller warnings or fault codes
- Motor temperature or thermal shutdown behavior
A large voltage drop can originate in the battery, fuse, disconnect, cable, solenoid, controller, lug, or negative return. Diagnose the complete circuit rather than replacing the motor based on weak thrust alone.
Bow Thruster Maintenance Checklist
- Identify the exact thruster model, voltage, serial number, and tunnel diameter
- Isolate every motor and control power source
- Clean the tunnel with non-damaging tools
- Inspect the tunnel bond, fairing, and coating
- Check propeller blades, hub, clearance, and shaft movement
- Remove line or debris without damaging seals
- Inspect gear-leg castings, joints, shaft, and seal area
- Check the correct anode and replace it at the model-specific limit
- Mask the anode and seals before compatible antifouling
- Inspect motor mounting, ventilation, brush area, and compartment dryness
- Check the battery, fuse, disconnect, cables, terminals, controller, and return path
- Recommission in the specified order and test only in suitable conditions
- Record measurements, parts, products, photos, and deferred repairs
Keep a Useful Bow Thruster Service Record
In BoatDuty, record the haulout date, engine or operating hours when relevant, thruster model and voltage, anode part number and measured condition, propeller damage, tunnel-coating product, electrical torque specifications, fuse rating, voltage-drop results, fault codes, parts used, and photographs before and after service. Note whether testing was completed ashore or after launch.
Those details help explain trends. A rapidly disappearing anode, recurring line damage, falling operating voltage, or repeated thermal warning is easier to diagnose when each season's observations are comparable. The result is a bow thruster that is not merely clean, but inspected as a complete mechanical, corrosion-protection, and high-current electrical system.