

Boat seat pedestal maintenance is easy to postpone because the hardware often keeps working even after looseness, contamination, or corrosion begins. Yet a pedestal, swivel, or slide supports a moving load in a wet, vibrating environment. A lock that does not fully engage, a loose deck base, or excessive play beneath the seat can turn a routine wake crossing into a safety problem.
An end-of-season inspection is a good time to clean the mechanism, identify its exact type, check every locking function, and document problems before the boat is covered. The correct procedure varies widely among fixed posts, removable fishing-seat pedestals, manual adjustable posts, air-rise pedestals, shock-mitigating systems, swivels, and fore-aft slides. Follow the manuals for the boat and installed seating hardware; do not assume that a lubricant or adjustment suitable for one system belongs on another.
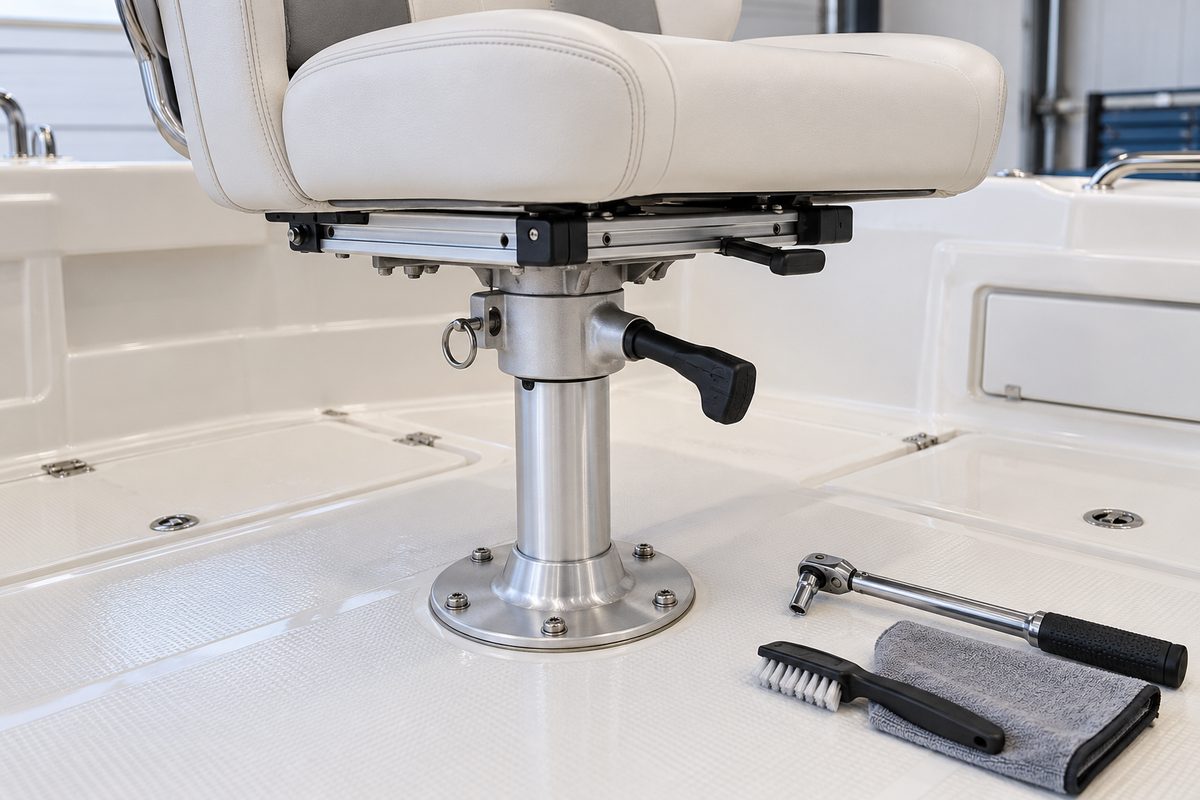
Identify the Pedestal System Before Servicing It
Start by recording the manufacturer, product family, post diameter, base style, seat-mount pattern, and any visible part numbers. Photograph the hardware from above and below before taking it apart.
Common arrangements include:
- a fixed-height post permanently bolted to the deck;
- a removable post that locks or tapers into a flush deck base;
- a manual adjustable post with a pin or threaded lock;
- an air-rise or gas-assisted height-adjustable pedestal;
- a shock-mitigating pedestal with springs, elastomers, or dampers;
- a swivel-only seat mount;
- a combined swivel and fore-aft slide; or
- a cable-activated slide and swivel assembly.
Not every seat is rated for every location or operating condition. A helm seat, a fishing seat used at low speed, and a seat occupied while the boat is underway may have different hardware and locking requirements. Replace parts by application rather than by appearance alone.
Clean First, Then Judge the Mechanism
Salt, sand, fish scales, sunscreen, spilled drinks, and oxidized grease can mask wear and keep a pin from seating. Vacuum or brush away loose debris, then wash the accessible hardware with fresh water and a mild cleaner approved by the seat-hardware manufacturer. Dry it completely.
Springfield Marine describes many of its pedestals as maintenance-free except for keeping them from becoming excessively dirty. That point matters: maintenance does not automatically mean adding grease. On Springfield Power-Rise units, the manufacturer specifically says not to lubricate the inner post because grease can attract dirt and contaminants.
Avoid spraying a general-purpose lubricant into every opening. It can migrate onto upholstery, collect grit, soften incompatible materials, or alter a friction surface. If the manual names a grease, anti-seize compound, or dry lubricant, use only that product type and only at the specified location.
Inspect the Deck Base and Mounting Surface
The pedestal base transfers seat loads into the deck. Clean around it and look for:
- loose, missing, mismatched, or corroded fasteners;
- movement between the base and deck;
- cracks radiating from screw or bolt holes;
- crushed sealant, staining, or moisture at the base edge;
- a distorted flange or elongated fastener hole;
- softness or flex in the deck around the base; and
- corrosion between dissimilar metals.
Do not simply tighten a loose fastener until it stops turning. A spinning screw, compressed core, failed backing plate, or water-damaged deck needs diagnosis. Use the boat builder’s specified fastener type, backing method, sealant, and torque. If the base must be removed, protect any cored deck from water intrusion and restore the mounting exactly as the builder directs.
For a flush removable base, inspect inside the socket with a light. Remove sand, fibers, and hardened debris without gouging the bore. Check locking slots, detents, bushings, and rotational stops for damage. A locking base that no longer retains the post should be repaired or replaced before the seat is occupied underway.
Check the Post for Straightness and Wear
Wipe the pedestal post clean and examine it in strong light. Look for bends, dents, cracks, deep scratches, pitting, worn coatings, and polished bands that reveal rubbing. Check the joint between the post and its upper or lower casting for movement.
A removable post should insert fully and lock by the manufacturer’s procedure. Do not hammer it into a dirty or corroded base. If removal is difficult, clean the mating surfaces and follow the product instructions; forcing the post can damage the base or deck.
For a manual adjustable pedestal, test the height lock at every intended position. Springfield’s current pedestal-care sheet says to confirm that the lock handle engages and disengages the locking pin, that the pin moves freely, and that it holds the inner post when locked. If the seat drops, rotates unexpectedly, or can be lifted past a stop, take it out of service.
Test Air-Rise and Power-Rise Pedestals Carefully
An air-rise pedestal should adjust smoothly and then hold its selected height without drifting. Inspect the activation handle, cable or linkage, and the contact point that operates the air cylinder. Springfield recommends checking that the handle depresses the activation screw sufficiently; if it does not, the manufacturer directs owners to the model-specific adjustment procedure.
Do not disassemble a pressurized cylinder unless the manufacturer’s service instructions explicitly authorize it. A unit that sinks, binds, leaks, or will not release may need a qualified technician or complete replacement. Keep the inner post clean and respect any manufacturer prohibition on lubrication.
Shock-mitigating pedestals may contain springs, elastomers, linkages, or dampers with separate inspection requirements. Check for cracked elastomers, leakage, looseness, and incorrect preload only as the product manual specifies.
Inspect the Swivel and Locking Pin
Rotate the seat through its full range with the boat stationary. The motion should be smooth, and the lock should engage positively at every designated position. Confirm engagement by trying to rotate the seat gently after releasing the handle.
Inspect the lock handle, pin, spring, stop, and receiving slots. Look for a pin that sticks, rounded slot edges, a loose handle, hardened grease, or debris preventing full travel. Never rely on friction alone when the seat is designed to lock.
Springfield’s Mariner and Workhorse guidance calls for checking that operating handles are tight and smooth. The handle assemblies use NLGI No. 2 marine-grade lithium grease, while a specific silver-grade anti-seize may be applied to the end of a difficult pin after the handle assembly is removed. That instruction is product-specific; do not copy it to an unknown pedestal.
Check the Fore-and-Aft Slide
Move the seat from stop to stop and engage the slide lock in several positions. The carriage should not lift, rack sideways, or continue moving after the latch is released. Inspect rails, end caps, rollers or bearing surfaces, the latch, and the seat-to-slide fasteners.
Springfield recommends periodic checks of slide fasteners even though the assemblies use thread locker. It also identifies difficult movement, visible corrosion, excessive wobble, and locks that fail to engage as reasons to replace a worn slide.
Do not add a second thread locker, change a fastener grade, or tighten adjustment screws by feel unless the manual provides the procedure. On some Springfield Mariner slides, three set screws and jam nuts adjust rotational tension; Workhorse II slides use a different design. Model identification comes first.
Inspect the Seat-to-Hardware Connection
The pedestal may be sound while the seat shell or seat-mount connection is failing. Look under the seat for loose fasteners, cracked molded material, damaged threaded inserts, pulled-through washers, corrosion, and movement between the seat and slide.
Use hardware approved by the seat and slide manufacturers. Fasteners that are too long can damage the cushion or interfere with the mechanism; fasteners that are too short may not develop adequate thread engagement. Do not drill new holes into a seat base without confirming the approved pattern and backing.
Perform a Controlled Load and Function Check
After cleaning and approved service, reinstall every removable part and engage all locks. With the boat secured and the engine off, check for movement by applying moderate force to the empty seat in the directions it normally sees: fore and aft, side to side, rotationally, and vertically. Listen for clicks and watch the base, post, slide, and seat shell separately.
Then operate height, swivel, and slide controls one at a time. Every control should return to its normal position, and every lock should engage consistently. Do not test a questionable pedestal by bouncing or using excessive force; remove it from service and inspect the structure.
Storage Decisions
If the manufacturer permits removal, taking a fishing-seat post out of its deck base can improve cover fit and reduce weather exposure. Clean and dry the post first, label its location, and protect the base opening with the approved cap. Store the seat upright in a dry, ventilated location where upholstery will not be compressed or stained.
For a fixed helm seat, leave slides and swivels in the storage position specified by the boat builder. Do not leave an air-rise control loaded or a cable kinked. Keep covers ventilated so condensation does not remain on metal parts.
Spring Recommissioning Checklist
- Clean the deck base and post before assembly.
- Reinstall any composite washer, bushing, cap, or stop in its correct position.
- Seat removable posts fully and verify retention.
- Check base, post, slide, swivel, and seat fasteners to the specified torque.
- Test height adjustment and confirm the pedestal holds position.
- Test every swivel and slide lock.
- Check for wobble at each joint separately.
- Confirm the seat and hardware are approved for the location and use.
- Replace any cracked, bent, corroded, or unreliable component before passengers use it.
Record the Work in BoatDuty
Record the service date, seat location, pedestal and slide manufacturer, model or part number, fastener specification, approved lubricant used, adjustments made, replacement parts, and any remaining play. Photos of the base, post markings, and underside hardware can make future parts ordering much easier.
Adding that information to BoatDuty turns a vague “seat checked” note into a useful maintenance record. If wobble returns, the history can show whether it began at the deck base, post, swivel, slide, or seat shell—and whether a repeated adjustment is masking a component that should be replaced.
Sources
- Springfield Marine, Care & Maintenance of Seat Pedestals (March 16, 2026)
- Springfield Marine, Care & Maintenance Instructions for Mariner, Mariner II, and Workhorse II Slides (March 16, 2026)
- Springfield Marine, “How to Install and Maintain Springfield Marine’s Mariner, Mariner II, and Workhorse II Seat Slides” (August 19, 2025)
- Springfield Marine, “Understanding ABYC Compliance: Why It Matters in Marine Seating” (October 6, 2025)