

A careful boat rub rail inspection before winter storage can reveal more than cosmetic scuffs. The rail takes routine contact at docks and pilings, protects the hull edge, and often covers or borders the hull-to-deck joint. A loose insert, displaced end cap, pulled fastener, or unexplained stain may therefore point to a maintenance need that is easier to address while the boat is clean, dry, and accessible.
Rub rails vary widely. Some boats use a flexible or semi-rigid vinyl base with a separate insert; others use rigid vinyl, aluminum, stainless trim, or a builder-specific profile. Fasteners, splices, end caps, sealants, and the relationship to the hull-to-deck joint are also model-specific. Treat this guide as an inspection framework, then follow the boatbuilder's instructions and the rub-rail manufacturer's documentation for parts, sealant, fastener size, and repair procedures.
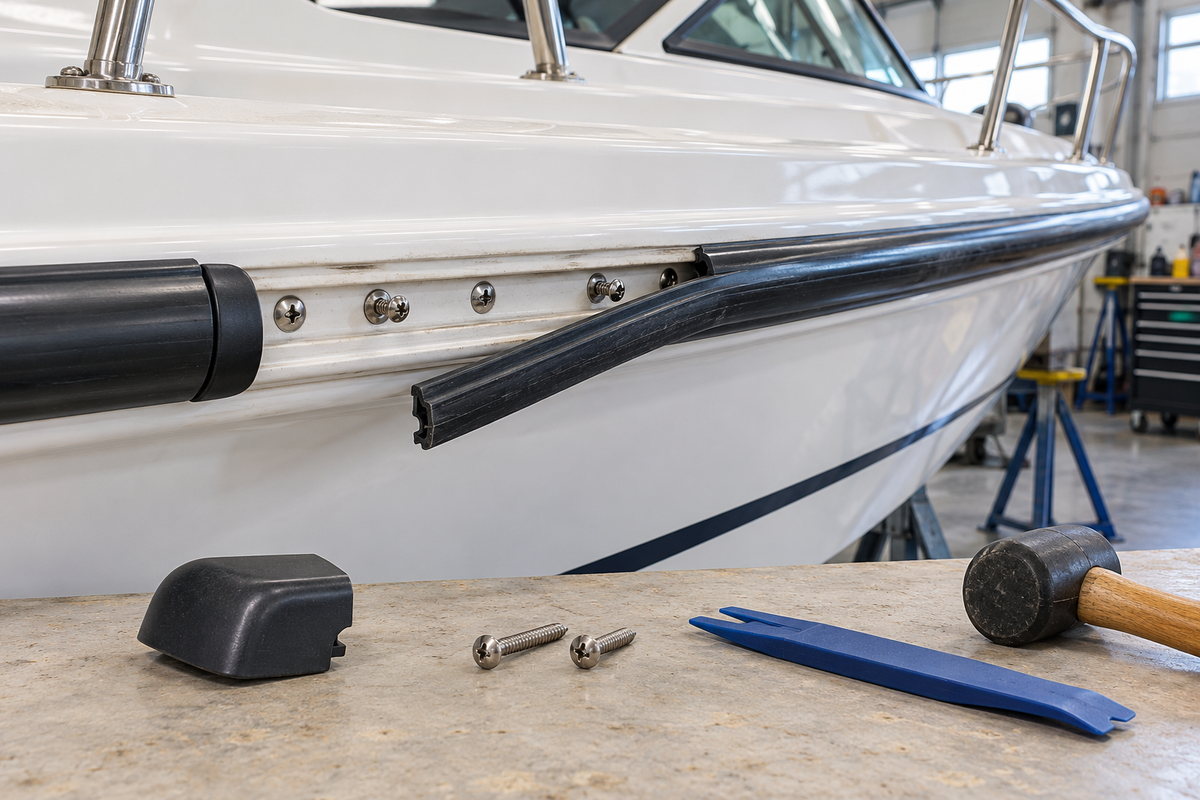
Why inspect the rub rail after the boat is hauled?
The end of the season is a useful time to look for changes while recent docking impacts are still easy to remember. A dry hull also makes it easier to distinguish trapped wash water from a recurring leak.
A sound rub rail should generally:
- remain consistently seated against the boat without long gaps or waves;
- retain its insert, trim, end caps, and splice covers;
- keep fastener heads secure without crushed or distorted rail material;
- show ordinary abrasion without cracks, sharp edges, or exposed hardware; and
- leave the adjacent laminate, aluminum, paint, and gelcoat free of spreading cracks or movement.
The rub rail is not automatically the boat's watertight hull-to-deck seal. On some designs it is primarily a protective and decorative cover over a separately bonded or mechanically fastened joint. On others, rub-rail hardware passes through or very near the joint. That distinction matters: replacing a loose insert is different from diagnosing joint movement or water entry.
Identify the rub-rail construction before removing anything
Start with the boat's parts information, original drawings, or a clear cross-section of the existing profile. If the manufacturer is unknown, photograph the rail from the side and end, and measure its overall height, depth, insert width, and total run. TACO Marine's replacement resources, for example, organize rails and inserts by profile and part number rather than appearance alone.
Common arrangements include:
- a flexible vinyl rail with an insert that hides the mounting screws;
- a semi-rigid or rigid vinyl base with a softer insert;
- an aluminum extrusion with a vinyl insert;
- a stainless-steel cap attached over vinyl or another base; and
- a sailboat-style rail associated with a horizontal hull-to-deck flange.
Do not pry off a full insert simply to learn what is underneath. A cold, aged insert may shrink, crack, or become difficult to reinstall. If selective access is necessary, consult the product instructions and warm flexible material only by the approved method. TACO's semi-rigid rail instructions note that flexible inserts can be pressed into the channel and seated with a rubber mallet; those directions do not apply to every profile.
Clean gently before judging damage
Rinse away salt and grit, then wash with a mild cleaner that is compatible with the rail material and the boat's finish. Avoid aggressive solvents, abrasive pads, and concentrated chemicals unless the manufacturer approves them. They can haze vinyl, attack adhesives, damage paint, or make fine cracking harder to interpret.
Let the area dry. Then inspect in bright, glancing light. A flashlight held nearly parallel to the hull can make waves, lifted edges, and hairline cracks easier to see. Work around the entire boat rather than concentrating only on the obvious dock side.
Inspect the insert and exposed trim
Follow the insert from end to end and look for:
- sections that have climbed out of the retaining channel;
- shrinkage that opens a gap at an end cap or splice;
- hardened, cracked, split, or chalky material;
- deep cuts that expose the base or a sharp metal edge;
- dents that prevent the insert from locking into the channel; and
- stainless trim that is bent, loose, or standing proud.
A short, flexible section that has popped free may be reseatable if the channel and locking lips are intact. If it repeatedly releases, investigate the cause instead of relying on adhesive as a universal fix. A deformed base, wrong replacement profile, missing retainer, trapped debris, or temperature-related shrinkage may be responsible.
Mark each defect with removable tape and photograph it. That creates a useful map before anything is disassembled.
Check the base, track, and fit against the hull
Sight along the rub rail from a shallow angle. The rail should follow the hull fairly and remain supported. Investigate:
- a localized bulge or flat spot after an impact;
- a gap that admits a thin plastic gauge or visibly changes when pressed;
- a base that moves separately from the hull;
- waviness around screw locations;
- cracked aluminum or distorted vinyl; and
- old sealant squeezed out in one isolated area.
Do not assume every seam is supposed to be filled. Drainage details and expansion clearances may be intentional. Compare both sides of the boat, consult the builder's documentation, and avoid sealing a path that was designed to drain.
Inspect fasteners without overtightening them
Where fastener heads are visible, check for looseness, corrosion, missing heads, enlarged holes, distorted washers, and cracks radiating into the surrounding material. Hidden fasteners should be exposed only where symptoms justify access and the insert can be safely reinstalled or replaced.
A loose screw is not an invitation to keep turning until the rail crushes. TACO's semi-rigid installation guide specifically says to stop tightening once the rail contacts the hull. Its instructions also call for marine-grade sealant on screw threads during installation and place new holes away from old filled holes. Those details illustrate why a pulled or spinning fastener needs a proper repair plan rather than a larger screw selected by guesswork.
If a fastener will not tighten, the hole may be stripped, the substrate may be damaged, or the original hardware may no longer be correct. If the fastener penetrates a cored laminate or a structural joint, have the repair evaluated by the builder or a qualified marine repairer. Record the exact hardware removed; stainless-steel grade, diameter, length, head style, washer arrangement, and backing method can all matter.
Examine end caps, splices, and corners
End caps and splice covers protect cut edges and keep the insert from migrating. Check that each piece sits flush, its tab or overlap still engages the rail, and its screws are secure. Look for cracked mounting holes, sharp edges, missing sealant where the design calls for it, and water trails behind the cap.
Manufacturer procedures are profile-specific. In one TACO surface-mount end-cap procedure, the rail and insert are trimmed square, the cap tab fits into the insert, marine-grade sealant is applied between cap and boat, and a stainless fastener secures the cap. That is a useful example, not a universal instruction. Reuse the original method only when it matches the actual product.
Corners deserve extra attention because the rail has been bent and may carry residual stress. Look for whitening or cracking in vinyl, opened splices, fasteners pulling through the base, and a cap that has shifted after an impact.
Read the clues around the hull-to-deck joint
Inspect the gelcoat, paint, laminate, or metal immediately above and below the rail. Escalate these findings:
- cracks that extend away from a fastener or impact point;
- brown, rusty, or dirty water trails from behind the rail;
- recurring interior dampness at the same station;
- a deck edge that moves relative to the hull when lightly loaded;
- crushed laminate, exposed core, or a soft area; or
- many loose fasteners concentrated in one region.
A stain alone does not prove structural failure, and a cosmetic rail can hide a perfectly sound joint. Conversely, replacing a scuffed insert will not correct a moving or leaking joint. If movement, core damage, or laminate cracking is suspected, stop cosmetic work and arrange a professional inspection.
Decide between spot repair, partial replacement, and full replacement
A spot repair may be reasonable when the rail profile is sound and the problem is limited to a replaceable end cap, a correctly repairable fastener, or a short insert section. Partial replacement is possible on some systems, but color fade, insert shrinkage, profile changes, and splice placement can make the result unsatisfactory.
Full replacement becomes more likely when:
- the base is brittle or distorted along a long run;
- fastener retention has failed in many locations;
- the insert no longer fits or the profile is obsolete;
- aluminum or stainless components are severely bent or corroded; or
- access is already required for a hull-to-deck joint repair.
Before ordering, confirm the actual perimeter plus the manufacturer's allowance, the correct insert, compatible end caps and splice covers, prescribed fasteners, and approved sealant. Do not substitute a permanent adhesive/sealant merely because it is strong; future serviceability and material compatibility matter.
Winter-storage rub-rail checklist
- Wash, rinse, and dry the entire rail.
- Photograph the port side, starboard side, bow, transom corners, end caps, and splices.
- Mark loose insert sections, gaps, cracks, dents, and sharp edges.
- Check accessible fasteners for movement, corrosion, and pulled-through heads.
- Inspect gelcoat, paint, laminate, and the interior near suspicious locations.
- Confirm that intended drain paths remain open.
- Order parts by verified profile or part number.
- Plan any hull-to-deck joint diagnosis before cosmetic replacement.
- After repair, verify a fair fit and recheck the area after the first few outings next season.
Record the inspection in BoatDuty
Create a BoatDuty maintenance record with the inspection date, storage location, rail and insert part numbers if known, fastener specifications, sealant used, and the station of every defect. Add photos before and after selective disassembly. If a repair is deferred, note whether the rail is merely scuffed or whether movement, leakage, or exposed hardware makes the boat unsuitable for normal use.
A short, precise record turns today's visual check into a baseline. Next season, you will know whether a gap is stable, a splice is opening, or a previously repaired fastener is moving again.
The practical takeaway
Rub-rail maintenance is not just polishing away dock marks. Inspect the insert, base, fasteners, end caps, splices, and adjacent hull structure as one system. Address loose parts before storage, and treat stains, repeated fastener failure, or hull-to-deck movement as diagnostic clues rather than cosmetic annoyances. The result is a safer edge, a cleaner finish, and a much clearer repair plan for spring.