

Haulout is the best time to inspect a fiberglass boat for hull blisters. With the bottom clean and dry, you can separate routine coating defects from gelcoat blistering and signs of deeper laminate damage—before fresh antifouling hides the evidence.
A raised spot is not automatically “osmosis,” and a blister is not automatically a structural emergency. The useful questions are where the defect begins, how widely it is distributed, what lies beneath it, and whether the laminate is sound. A careful inspection creates that map. Diagnosis and repair specifications should then come from the boatbuilder, coating manufacturer, and—when damage is widespread or uncertain—a qualified marine surveyor or composite-repair professional.
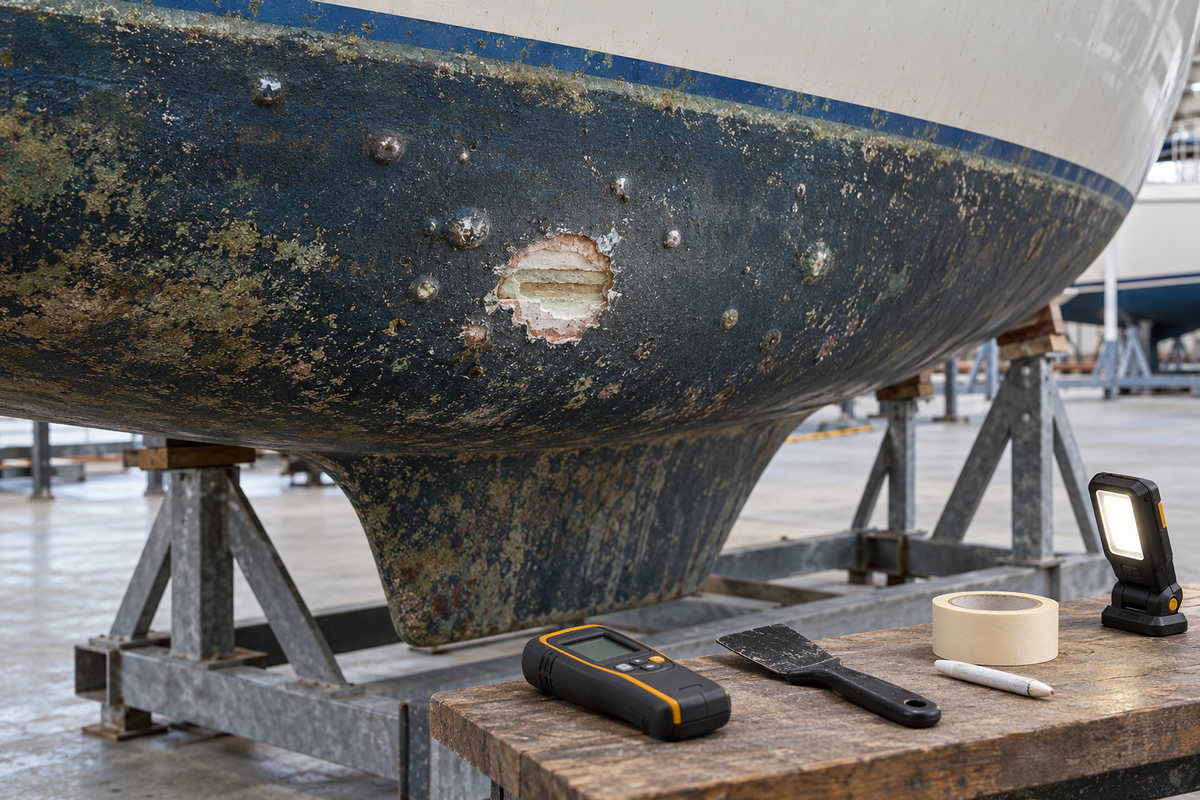
Why Blisters Form in Fiberglass Hulls
A fiberglass hull is a layered structure. On many production boats, the exterior includes antifouling paint, possibly a primer or barrier system, gelcoat, and resin-and-glass laminate. A bump can originate in any of those layers.
Coating bubbles may result from poor adhesion, trapped solvent, contamination, incompatible products, or recoating outside a product's specified window. These defects can lift paint while leaving the gelcoat beneath intact. Gelcoat blisters form when moisture and water-soluble materials interact behind the gelcoat, creating pressure that raises a dome. The term osmosis is commonly used for that moisture-driven process, but visible symptoms alone do not establish the full condition of the laminate.
Damage can also occur within the laminate. WEST SYSTEM's blister manual distinguishes isolated gelcoat damage from interlaminate blistering and discusses evaluating the extent, exposing damage, reducing laminate moisture, repairing the affected structure, and applying a barrier coat. That distinction matters: filling a surface cavity is not an adequate repair when the glass reinforcement has separated, softened, or fractured.
Start With the Right Inspection Conditions
Ask the yard to pressure-wash marine growth soon after haulout, but do not rush immediately into grinding or painting. Preserve the evidence long enough to inspect it. Some blisters become less obvious as pressure dissipates and the hull dries, so an early walkaround is valuable. A second inspection after the surface is clean and dry can reveal coating edges, cracks, and prior repairs more clearly.
Use bright, raking light and look from several angles. Wear eye protection and suitable gloves if you open or sand any defect, and follow coating and resin safety data. Antifouling dust requires appropriate containment and respiratory protection; yard and environmental rules apply.
Useful inspection items include:
- A plastic scraper for testing loose coating without gouging sound gelcoat
- Painter's tape or a grease pencil for marking locations
- A ruler or coin for scale in photographs
- A bright inspection light
- A notebook or BoatDuty record for dates, haulout location, water type, and observations
- A moisture meter only when the operator understands that coatings, metal fittings, temperature, laminate thickness, and calibration can influence readings
Map the Pattern Before Opening Anything
Begin at the bow and work aft in consistent horizontal bands. Inspect the keel, turn of the bilge, rudder, transom, and areas around through-hulls, but do not confuse separate appendage or bedding problems with hull blistering.
For each raised area, record:
- Position relative to a fixed reference, such as a through-hull or boot stripe
- Approximate diameter and height
- Whether it is isolated, clustered, or part of a widespread rash
- Whether the surface is antifouling paint, barrier coat, gelcoat, or a prior repair
- Nearby cracks, impact marks, weeping, discoloration, or delamination clues
- A close photo and a wider context photo
Distribution is often more informative than one dramatic spot. A few scattered paint bubbles call for a different response than hundreds of similar domes across the underwater body. Symmetry can also be helpful: a concentration on one side may point toward local repair history, heat exposure, grounding damage, or a coating application issue.
Do not puncture every bump. If opening a sample is appropriate, obtain the yard's permission and choose a representative defect. Opening defects changes the repair scope and can release contaminated liquid or antifouling material. When a purchase, insurance claim, warranty, or major repair decision is involved, have a surveyor document the hull before destructive testing.
Paint Bubble, Gelcoat Blister, or Deeper Damage?
Coating-only bubble
A coating bubble generally separates within the paint, primer, or barrier layers. When loose coating is carefully removed, the substrate below may remain hard, smooth, and intact. The edges can reveal which layer lost adhesion. Record the full coating stack if colors or layers are visible; that history is useful when selecting compatible removal and replacement products.
Do not assume every coating bubble is harmless. Widespread failure can require extensive removal, and contamination or trapped solvent must be corrected before recoating. Follow the specific coating manufacturer's troubleshooting and preparation instructions.
Gelcoat blister
A classic gelcoat blister presents as a raised dome whose cavity is at or behind the gelcoat. An opened blister may contain liquid and expose a crater or porous material. Odor, acidity, or appearance can offer clues to a professional, but sniffing unknown liquid is not a safe diagnostic method. Avoid skin and eye contact, contain the residue, and document the cavity.
The repair scope depends on size, number, depth, moisture, and laminate condition. A small isolated cavity may be ground to sound material, dried, filled, faired, sealed, and recoated under an approved repair system. A widespread field can require peeling or removal of affected gelcoat, extended drying, laminate repairs, fairing, and a full barrier system. Those are not interchangeable jobs.
Interlaminate or structural concern
Escalate when grinding reveals separated glass layers, white or fractured fibers, soft laminate, broad voids, deep cracking, or a dull area that sounds different during professional percussion testing. Impact damage and manufacturing voids can coexist with moisture symptoms. A surveyor or composite technician should determine the boundaries and a repair laminate schedule; do not improvise structural layup thickness or fiber orientation.
Use Moisture Readings as Comparative Evidence
Moisture meters can help map relative differences, but a single number is not a verdict. Establish readings on known dry, comparable areas and use the same instrument, range, pressure, and surface condition. Keep away from metal backing plates, tanks, wiring, wet bilges, and bonded hardware that can skew results. Heavy coatings may also affect the response.
Log a grid rather than chasing the highest display. Repeat the grid after a documented drying interval. A downward trend under similar conditions is more useful than comparing readings from different meters or different days without temperature and surface notes. If a repair system specifies an acceptable moisture condition, use the method named by that manufacturer or the repair professional.
Build the Repair Plan Around the Actual Failure
An effective plan follows the layer where failure occurred:
- Confirm the defect. Map it, identify the failed layer, and determine whether the laminate is sound.
- Remove compromised material. Open or remove only as much as needed to reach clean, firmly bonded substrate, using dust control and yard-approved methods.
- Wash when the repair system requires it. Opened osmotic cavities can contain soluble residues. Follow the resin or coating maker's wash-and-dry procedure rather than sealing contamination in place.
- Dry and monitor. Provide ventilation and time appropriate to the repair system. Record comparative moisture readings and environmental conditions.
- Repair laminate damage first. Use a builder-approved or professionally designed laminate schedule for structural work.
- Fill and fair. Use compatible materials and observe mix ratios, temperatures, cure times, and maximum application thicknesses.
- Apply the specified barrier system. Film build depends on product, application method, and number of coats; follow the current technical data sheet.
- Time the antifouling tie-coat correctly. The final barrier-to-antifouling window is product-specific. Missing it can create another adhesion failure.
Barrier coating is not a shortcut around wet or unsound laminate. WEST SYSTEM explicitly places evaluation, moisture reduction, isolated or interlaminate repair, and barrier application as separate parts of the process. The substrate has to be ready before it is sealed.
When to Call a Surveyor or Composite Professional
Professional evaluation is prudent when:
- Blisters are widespread, recurring, unusually large, or concentrated around a prior repair
- The hull has soft spots, cracking, distortion, impact history, or suspected delamination
- Moisture readings are broadly elevated or difficult to interpret
- The repair may involve peeling gelcoat or replacing laminate
- The boat is under warranty or the finding affects a sale or insurance claim
- You cannot positively identify the failed layer
A written scope should state what will be removed, how dryness will be judged, which products and laminate schedule will be used, how film thickness will be achieved, and how the repair will be inspected before launch.
Hull Blister Inspection Checklist
- Photograph the clean hull before sanding or opening defects
- Inspect early after haulout and again after cleaning and drying
- Map every cluster by location, size, and apparent layer
- Note cracks, soft areas, weeping, impact marks, and prior repairs
- Open only representative defects with yard or surveyor approval
- Treat meter readings as comparative data, not a stand-alone diagnosis
- Escalate any suspected interlaminate or structural damage
- Obtain current technical data sheets for every repair and coating product
- Record drying checks, materials, batch details, film-build plan, and cure windows
- Inspect the completed surface before antifouling and before relaunch
Keep the Hull's History With the Boat
Blister work becomes easier to evaluate when the record survives longer than the yard invoice. In BoatDuty, log the haulout date, water type, hull hours or seasonal context where relevant, marked locations, photos, moisture-map method, professional findings, products and batch numbers, coat dates, and relaunch date. At the next haulout, photograph the same reference points. That comparison shows whether an isolated repair remained stable or a pattern is developing.
The goal is not to label every bump “osmosis.” It is to preserve evidence, identify the failed layer, and match the repair to the actual condition. A methodical hull blister inspection prevents both under-repairing real laminate damage and overreacting to a coating bubble.