

A boat garboard drain plug is a small fitting with an outsized job. When the boat is hauled, opening this low-point drain lets incidental water leave the bilge. Before launch, that same opening must be closed with the correct plug, in sound threads, with a sealing surface that can keep the sea outside the hull. End-of-season storage is the ideal time to inspect the entire assembly rather than treating plug removal as a last-minute chore.
This guide covers threaded garboard or hull-drain fittings installed near the lowest practical point of a fiberglass hull. It does not replace the boatbuilder’s instructions, and it does not apply to every removable drain used in livewells, coolers, or cockpit plumbing. Identify the fitting on your boat, find its manual or parts information, and use the specified plug, seal, thread treatment, fastener torque, and bedding material.
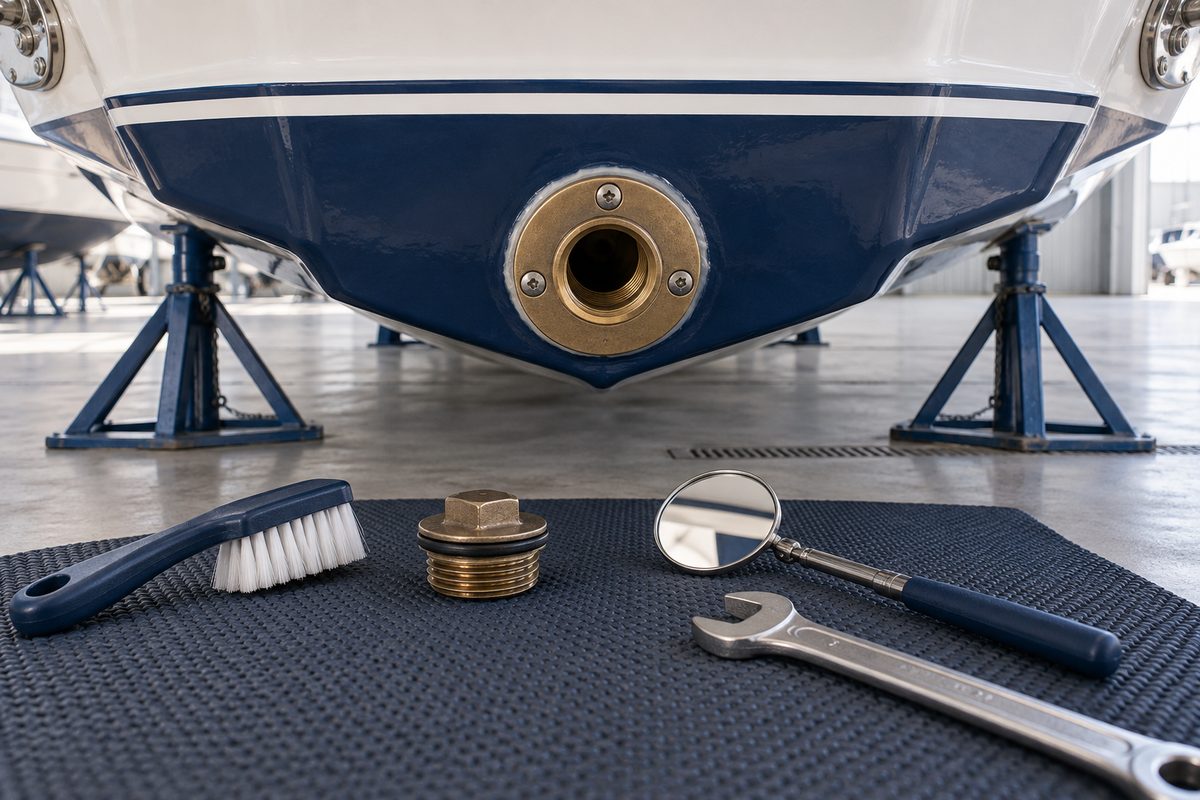
Why the Garboard Drain Deserves a Deliberate Inspection
A typical garboard drain includes a flanged body bedded and fastened to the hull plus a removable threaded plug. Perko’s current underwater-hardware catalog, for example, lists a cast-bronze flange with a brass 1/2-inch NPT plug and three mounting screws. Other builders use different metals, plug styles, thread forms, and mounting arrangements. Similar appearance is not proof of interchangeability.
The storage routine has two separate goals:
- Leave the hull configured so trapped water can drain while the boat is out of the water, if the builder directs it.
- Make sure the plug and fitting will be ready for a reliable watertight closure before the next launch.
Grady-White and Sea Ray both advise removing hull drain plugs during out-of-water storage and supporting the boat so water drains instead of pooling. Their launch guidance also emphasizes reinstalling the drain plug before the boat enters the water. Those are simple instructions, but inspection is what makes them dependable.
Start With a Dry, Safely Supported Boat
Do not work beneath a hull supported only by a jack, travel-lift slings, or an improvised blocking arrangement. The boat should be secured by the yard or supported according to the boat and stand manufacturers’ directions. Turn off equipment that can discharge into the bilge, and verify that the boat is completely out of the water before loosening a hull drain.
If the boat will remain stored outdoors, confirm that the bow-up attitude, cover, and ventilation arrangement will not direct rainwater into the bilge faster than it can escape. A missing plug is not a substitute for correcting leaking covers, blocked cockpit drains, failed deck seals, or a poorly supported storage angle.
Have a small tray or mat ready so the plug cannot roll away. Photograph the installed position before removal, especially if the plug has a gasket, O-ring, retaining chain, special washer, or model-specific orientation.
Remove the Plug Without Damaging the Fitting
Use a tool that fits the plug head fully. An undersized adjustable wrench, pliers, or a screwdriver used as a makeshift lever can round a head or scar a sealing surface. Hold the tool square to the plug, apply steady force, and stop if the flange moves with the plug.
A turning flange, cracked bedding seam, or flexing hull laminate is not a “tight plug” problem. It indicates that the fitting may need to be removed and rebedded or that the surrounding laminate requires assessment. Do not keep twisting against a loose through-hull fitting.
Once removed, place the plug in a labeled container or secure it in the builder-provided holder. Leaving it loose in a toolbox invites substitution with a plug that looks close but has the wrong thread or material.
Clean the Threads and Drain Passage
Wipe away silt, dried bilge residue, old thread compound, and corrosion products with a soft cloth or nylon brush. Avoid aggressive wire wheels, rotary abrasives, taps, or dies unless the fitting manufacturer or a qualified technician specifically calls for them. Removing metal or recutting tapered pipe threads changes how the plug seats.
Inspect the open passage with a light and mirror. It should lead freely into the bilge and should not be blocked by sludge, paint, sealant, ice, or stored gear. Clean from the accessible side without pushing debris deeper into an inaccessible cavity. If the drain will not pass water from the bilge, find the obstruction before storage.
Keep bottom paint and barrier-coat buildup out of the threads and off any intended metal-to-metal or gasket sealing surface. When coatings around the flange need repair, follow both the coating maker’s instructions and the hardware maker’s material-compatibility guidance.
Inspect the Plug, Threads, Flange, and Bedding
Dry the parts and examine them under good light.
Plug and thread condition
Look for rounded wrench flats, flattened or crossed threads, deep pitting, cracks, impact damage, or an eroded sealing face. A plug that starts crooked, binds immediately, or remains loose after several turns may have mismatched or damaged threads. Do not force it.
If the design uses an O-ring or gasket, inspect it for flattening, cuts, hardening, swelling, and loss of elasticity. Replace it only with the size and material specified for that fitting. Do not add a random washer to compensate for damaged threads or a distorted seat.
Flange and fasteners
Check the drain body for dezincification-like pink coloration, crumbling metal, deep corrosion, cracks, or distortion. Inspect mounting screws or bolts for corrosion, movement, missing heads, or dark streaks from the holes. Hardware composition matters underwater; avoid casual substitutions between brass, bronze, stainless steel, and other alloys.
Bedding and surrounding hull
The flange should sit firmly against the hull with a continuous bedding edge. Watch for gaps, peeling sealant, rust-colored or green staining, moisture weeping from a fastener, crazing, soft laminate, or a flange that rocks under light hand pressure. Repeatedly smearing sealant around the outside does not correct failed bedding behind the flange.
If any of these conditions appear, schedule removal and rebedding according to the boatbuilder and fitting manufacturer rather than attempting a cosmetic patch. A cored hull may require extra inspection to determine whether water reached the core.
Decide How the Plug Should Be Stored
Many builders call for the plug to remain out during dry storage so the bilge can drain. Follow the exact instructions for your boat and storage facility. Store the cleaned plug dry, protected, and unmistakably associated with the hull opening.
Good options include a labeled lidded container at the helm, a brightly tagged pouch clipped to the ignition key, or the boatbuilder’s dedicated plug holder. The point is not decoration; it is to create a physical reminder that the boat cannot be launched in its stored configuration.
If the manual directs installation during storage, follow its instructions for seals or thread treatment. Never assume that common plumbing tape, pipe dope, grease, or sealant is appropriate. Products can change installation depth, attack an O-ring, contaminate a waterway, or make later removal difficult.
Correct Storage Angle and Water Management
With the drain open, verify that the hull’s attitude actually leads water toward it. Sea Ray advises storing the bow slightly elevated, while Grady-White likewise calls for supporting the boat so water drains to the plug opening. The correct angle and support points are model-specific.
Pouring a small amount of clean water into an accessible low bilge area can confirm the flow path, but do not flood compartments, wet electrical equipment, or use this test where freezing weather will arrive before complete drainage. If water remains in pockets, remove it manually and investigate blocked limber holes or poor hose routing.
Check the boat periodically during storage. Leaves, insects, ice, dirt, and displaced covers can change drainage conditions after the initial layup.
Recommission the Drain Before Launch
Treat plug installation as a formal launch item, not a memory test.
- Retrieve the identified plug and compare it with the fitting.
- Inspect the plug, gasket or O-ring, threads, flange, fasteners, and bedding again.
- Confirm the drain passage is clear and the bilge is clean.
- Apply only the seal, lubricant, or thread treatment specified for that exact fitting.
- Start the plug by hand. It should engage smoothly without cross-threading.
- Tighten it using the manufacturer’s method and torque, if one is published. Do not use extra leverage merely to make it “safer.”
- Add a visible drain-plug confirmation to the launch checklist.
- After launch, inspect the inside of the fitting immediately and again after the boat has settled. Any seepage requires prompt haulout or other safe corrective action; do not rely on the bilge pump to manage a defective hull closure.
Never install a temporary rubber expansion plug, hardware-store pipe plug, or similar substitute unless the boat or drain manufacturer explicitly approves it for that fitting and service.
When to Call a Marine Technician
Professional evaluation is appropriate when:
- the flange moves, the bedding has failed, or the laminate feels soft;
- threads are cracked, badly corroded, crossed, or cannot be identified;
- metal shows deep pitting, pink coloration, wasting, or possible galvanic damage;
- fasteners spin, weep, or cannot be accessed for proper replacement;
- the drain passage is blocked inside a concealed structure;
- the plug will not seat as designed; or
- the boat takes on water at the fitting after launch.
Underwater hardware is a poor place for guesswork. Correct parts and a sound hull interface matter more than making an improvised part feel tight.
Garboard Drain Maintenance Checklist
- Confirm the boat is safely supported and fully out of the water.
- Identify the exact drain fitting and find model-specific instructions.
- Photograph the plug, seal, and installed orientation.
- Remove the plug with the correct tool; stop if the flange moves.
- Clean the plug, threads, passage, and surrounding flange gently.
- Inspect for thread damage, corrosion, cracks, worn seals, and rounded flats.
- Check mounting hardware, bedding, laminate, and drainage path.
- Store the plug dry in a labeled, launch-critical location.
- Set and periodically verify the boat’s correct drainage angle.
- Reinstall by hand with only approved seal or thread treatment.
- Put “garboard drain plug installed” on the launch checklist.
- Inspect for leakage immediately after launch.
Record the Work in BoatDuty
Log the removal date, fitting make or part number, plug size and thread type, gasket or O-ring details, products used, observed corrosion, bedding condition, repairs, and the planned reinstall date in BoatDuty. Add a note identifying where the plug is stored. At recommissioning, record installation and the post-launch leak check. A short, precise history helps prevent both missed launches and unnecessary replacement with the wrong part.