

Cockpit drains and scuppers are easy to overlook because they usually work without attention. Leaves, fishing line, dirt, degraded hoses, loose clamps, and stiff one-way valves can change that quickly. A boat cockpit drain and scupper maintenance inspection before winter helps ensure rain, melting snow, and wash water leave the boat instead of collecting on deck or finding a path into the bilge.
This article covers gravity-drain systems commonly found on self-bailing cockpits and decks. Boats differ: some drains empty through transom scuppers above the resting waterline, some route to side outlets, and some have discharge fittings near or below the waterline with seacocks or check devices. Follow the boatbuilder's documentation for the exact layout. Do not assume a valve, flap, or ball makes an installation safe if a hose or fitting fails.
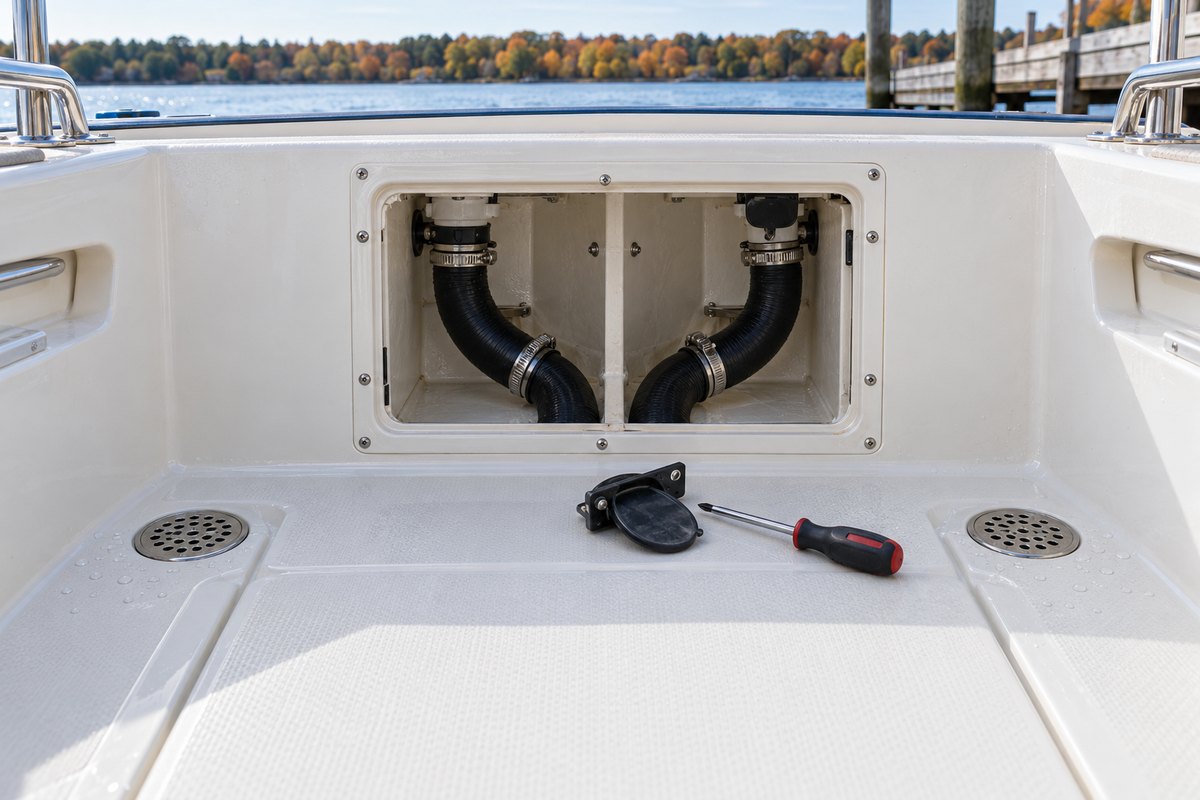
Understand the complete drainage path
A drain grate is only the visible beginning of the system. A typical path includes:
- A deck or cockpit drain body at a low point
- A tailpiece or elbow below the drain
- A reinforced hose with clamps and supports
- A transom or hull outlet
- In some installations, a flapper, duckbill, ball-check scupper, or seacock
Some boats have separate port and starboard drains. Others join drains before the outlet, or use molded passages instead of hoses. Map every drain before servicing it. Pouring water into one grate and seeing water at an outlet does not prove that every branch is clear.
Photograph the route, label inaccessible connections, and note whether any outlet can be submerged when the boat is loaded, heeled, backed down, or exposed to following seas. Perko, for example, makes a cockpit scupper with a rubber check ball specifically described for a discharge below the waterline. That product-specific design should not be generalized to a plain open drain.
Why a small defect can become a large problem
Cockpit drains have to move rain and deck water without leaking into the hull. A blockage reduces drainage capacity, but a split hose or separated connection can redirect every gallon into the bilge. BoatUS has documented drain-hose and clamp failures as serious flooding risks and warns that a clogged or slow cockpit drain can threaten a boat, especially when weight pushes the outlets lower.
Winter adds several stresses:
- Leaves and debris can collect while the boat is unattended.
- Freeze-thaw cycles can turn trapped water into an ice plug.
- Snow, rain, and ice can add enough weight to lower the stern.
- Rubber flaps can stiffen, stick open, or seal against debris.
- Water in low hose sections can freeze and damage fittings or hose.
- Covers can concentrate runoff into a cockpit instead of shedding it overboard.
A bilge pump is not a substitute for working cockpit drains. The cockpit drainage system should move water overboard by its intended path before water reaches the bilge.
Begin with a safe inspection
The risk depends on whether the boat is afloat or ashore. If an outlet, fitting, or hose is at or below the waterline, opening the system while afloat can create a flooding path. Before loosening a clamp or removing a valve:
- Identify the fitting and confirm its height relative to the waterline.
- Close the associated seacock when one is installed and verify that it actually stops flow.
- Isolate nearby electrical equipment and keep water away from energized connections.
- Have the correct soft plug and a plan for unexpected water entry.
- Stop if the fitting cannot be safely isolated.
For an ashore inspection, support the boat as directed and keep drain plugs, winter covers, and storage angle in mind. A boat stored bow-high may drain differently than it does at the dock.
Clean the grates and drain bodies
Remove loose leaves, line, hair, mud, and other debris by hand or with a soft brush. If the grate is designed to be removed, use the manufacturer's procedure so screws, sealant beds, and molded threads are not damaged.
Inspect for:
- Cracked plastic, distorted metal, or sharp edges
- Loose fasteners or a drain body that moves in the deck
- Failed bedding or staining around the flange
- Corrosion, mineral scale, and marine growth
- Debris caught immediately below the grate
Do not drive a screwdriver, stiff wire, or high-pressure nozzle blindly through the drain. It can puncture a hose, damage a check valve, or push a blockage deeper. Use a flexible non-damaging tool only when the boatbuilder or drain manufacturer allows it.
Inspect every accessible hose and connection
Open the appropriate service panels and trace each drain hose from the deck fitting to the outlet. A drain hose should remain securely attached, supported, and free of damage through its entire accessible run.
Look for:
- Cracks, splits, abrasion, soft sections, bulges, or a hose that has become hard and brittle
- Kinks, flattened bends, or low sections that retain water
- Chafe where the hose crosses a bulkhead or contacts equipment
- Rust staining or salt deposits around clamps and fittings
- A hose end that no longer reaches fully onto the fitting
- Movement at the connection when the hose is handled gently
- Unapproved repairs, mixed hardware, or sealant used to hide a leak
Inspect clamps closely. A clamp can look intact from above while the band is cracked or corroded underneath. BoatUS notes that cockpit-drain hose clamp failures have contributed to sinkings. Use the clamp type, material, quantity, and placement specified for the installation. Do not add a second clamp unless the fitting has enough barb length for both clamps to sit fully on the supported portion of the hose.
Replace a suspect hose or clamp rather than trying to make it last through another storage season. A drain line must tolerate vibration, movement, and water exposure while preserving its inside diameter.
Check the scupper outlet and one-way device
Examine the exterior outlet from outside the boat. Confirm that it is not blocked by growth, paint, debris, a storage support, or shrink-wrap material. Inspect the flange and surrounding hull or transom for cracks, movement, missing fasteners, or failed sealant.
If the outlet includes a one-way feature, identify its type before disassembly:
- Flapper valve: The rubber flap should move freely, lie flat, and return without sticking. Replace material that is curled, cracked, swollen, or hardened.
- Duckbill valve: Inspect for deformation, splits, deposits, and lips that cannot close. Use the exact replacement specified by the manufacturer.
- Ball-check scupper: Verify that the ball moves freely and the seat is clean. Perko's bronze cockpit scupper uses a rubber check ball and includes a deck key; follow its instructions rather than prying at the assembly.
- Seacock-controlled outlet: Exercise and service the seacock according to its manufacturer. Do not count on a stiff or partly closed valve for winter protection.
A one-way device can reduce nuisance backflow, but it also adds a moving part that can collect debris. It must open easily enough for drainage and close as designed when water approaches from outside.
Flow-test each drain separately
After visual inspection and reassembly, test one drain at a time with a controlled amount of clean water. Have someone observe every accessible connection and the exterior outlet. If the boat is ashore, collect the discharge as needed.
Verify that:
- Water begins moving promptly and does not pool around the grate.
- The correct outlet flows, confirming the mapped path.
- No water appears in the bilge or service compartment.
- Hose connections remain dry.
- The one-way device opens without excessive restriction and returns to its normal position.
- Port and starboard drains perform comparably when their layouts are similar.
BoatUS recommends confirming that cockpit drains run freely, but force is not the goal. A high-pressure blast can hide a partial blockage temporarily or damage an old hose. Start with normal flow. If drainage is slow, isolate the restriction and clean or replace the affected component using the manufacturer's method.
Do not use compressed air on an assembled drain system unless the manufacturer specifically approves the pressure and procedure.
Prepare the system for winter storage
The storage plan should keep debris out without trapping water. Clean the cockpit, remove gear that blocks drains, and make sure the cover sheds water away from the boat. Never seal a drain with tape or a plug merely to keep insects out unless the boatbuilder explicitly directs it; a blocked outlet defeats the system when rain or meltwater arrives.
For boats stored ashore:
- Confirm the storage angle allows water to reach the drains.
- Drain low hose sections according to the boatbuilder's procedure.
- Leave removable check components in the specified storage position.
- Make certain supports, straps, covers, and shrink-wrap vents do not obstruct outlets.
- Recheck after the first heavy rain and during freeze-thaw weather.
For boats remaining afloat:
- Keep drains and exterior outlets unobstructed.
- Verify dock lines and loading do not hold a scupper underwater.
- Visit the boat after storms and periods of falling temperature.
- Monitor the bilge for water that could indicate an unseen drain-hose leak.
- Follow the marina and boatbuilder's cold-weather requirements.
BoatUS specifically advises checking that leaves do not clog cockpit scuppers during winter. A cover helps only when it remains secure and sends runoff outside the cockpit.
Spring recommissioning checks
Before launch—or before relying on the system after in-water storage—repeat the visual inspection and flow test. Reinstall any removed flapper, ball, grate, hose, or access-panel hardware with the specified seals and fasteners. Confirm all intentionally closed seacocks are returned to their operating position.
Load and trim affect scupper behavior. Once the boat is in the water, inspect the outlets at the normal dockside load. Look for persistent backflow, a cockpit that drains slowly, or a stern that sits lower than the previous baseline. Those symptoms require investigation rather than a larger flap fitted as a guess.
Cockpit drain and scupper checklist
- Map every cockpit drain, hose, outlet, check device, and associated seacock.
- Photograph the route and record which drain serves each outlet.
- Remove debris from grates and drain bodies without damaging the hose below.
- Inspect drain flanges, bedding, fasteners, and surrounding fiberglass.
- Check hoses for cracks, stiffness, soft spots, chafe, kinks, and trapped-water lows.
- Inspect the full circumference of clamps and verify correct placement.
- Clean and test flapper, duckbill, ball-check, or seacock components as applicable.
- Flow-test each drain separately while watching every accessible connection.
- Confirm no test water reaches the bilge.
- Set the boat and cover so rain and meltwater can leave freely.
- Recheck the cockpit after storms and freeze-thaw cycles.
Record the work in BoatDuty
Record the inspection date, boat location, drain layout, hose sizes and markings, clamp condition, valve or flapper part numbers, flow-test results, leaks, repairs, and storage configuration in BoatDuty. Photos of each accessible connection and exterior outlet make it easier to spot movement or deterioration next season.
Cockpit drains are passive equipment, but their maintenance should be deliberate. A clear grate, sound hose, secure connections, and a freely moving scupper provide a drainage path that can still work when the boat is unattended and the weather is at its worst.